阅读视图
买了云记APP
2023年的时候,《为了孩子的学习,入手华为MatePad 11》。当时主要是给闺女学习拼音用的,也花了一百多块钱买了洪恩的季度软件。但是现在学习之余却成了他们的娱乐工具。现在的平板上闺女安装了蛋仔派对儿子安装了王者,还有很多很多乱七八糟的小游戏。只要不是学习时间两个孩子都想着玩平板,这样下去真的不得了,必须要没收,没有商量的余地。
平板孩子不用了,也不能让它吃灰呀,正好这段时间需要看资料学习,而打印的东西又太多,所以计划直接在平板里看。年前自己从海鲜上淘了华为手写笔,硬件都准备好了,就是配备软件了,这两天测试了华为自带的笔记软件、云记、享做笔记和Notein四款。
对于这四款手写笔记软件,华为自带的笔记软件功能还是非常的少的,连word文档都不能导入,可以直接省略。对于云记、享做笔记和Notein这三款,想要使用全功能,都需要购买VIP。三款软件终身VIP价格也相差不大,都是五十来块钱,价格方面还是可以接受的。价格方面三者没有太大的区别,还是比较下功能及使用体验吧。
最终我还是花了52块钱买了个云记终身VIP。为什么选择云记呢,我感觉云记里有一个功能非常适合“记忆”,就是“记忆胶带”功能,可以把重点文字内容遮挡起来,点击之后再显示。另外选择云记的原因就是云备份不需要再单独购买,是包含在VIP里,而其他两款还需要再花10块钱一个月单独开通。云记云备份功能可以直接把数据同步到华为云盘,也可以把数据备份至百度网盘和OneDrive里。
软硬件都有了,就差自己努力的学习了!估计近三四个月时间,博客更新频率会降!以学习为重!
聊聊寒假
寒假结束了,已经都上班一周时间了,这才能坐下来给博客除个草,已经快一个月没有更新了。那就来聊聊这个寒假吧!
今年寒假过年前的“主题”和以往一样,就是一个“忙”字。虽然其他同事都放假了,但是由于我的岗位原因,都是一直忙到过年前两天才能算结束,今年也同样。经费年报、资产年报、统计年报、决算等等都是年前必须要完成的,而今年又多出一个2024调标,忙是忙了更多,但是每位老师又调了几百块钱上去,大家都还是非常高兴的。一直到腊月二十七,把老师的2024年绩效工资报了才算是把年前的事忙完。这也是每年的惯例,把钱领了,也能让大家开开心心过个年。
年后的主题和以前太一样了,以往都是“吃、喝、玩、乐”,而今年“乐”少了许多。过年嘛,都是这样,从初二开始就是相互走亲戚,走亲戚也就是吃吃喝喝玩玩的事。这几年每年年后都是乡下老家几天、再到老婆的几个叔伯家几天、好多家都要跑。而到老婆的几个叔伯家氛围较以往不一样了,孩子的大外公病重的厉害,但是他却还坚持到他几个兄弟家聚聚,饭菜一口也吃不下,但是坐在那默默地看着,可能他自己也感觉到以后这样的机会不会再有。也就是前几天正月十七,人还是走了!很多人都说四五十岁年龄的人是最为悲哀,看着自己身边的长辈们一个一个的离去。把小的养成人、把老的捧下地,这也就是四五十岁年龄人的使命吧!
以往寒假还坚持着每天上上网、浏览浏览博友的博客,也能坚持着每周更新一篇,但是今年寒假很少开电脑了。在家就要有在家的样子,在家就要多多陪陪家人。
吐槽下物业吧!
每年到交物业费的时候,那必定要想要吐槽一下小区的物业。
2016年我住的小区才建成的时候,管理还是算“规范”的,说是什么“星级物业”,所以收费都是按“星级标准”来收费。在我们这样的苏北小县城,我们小区物业收费算是比较贵的了。我家住在16楼,住房面积是117平,一年物业费是1659元。
小区有地下停车位和地上停车位两种,地下停车位是只卖不租,车位均价在七八万块钱,而地上车位每年近2000块钱。小区建成之初,只要是没有买车位或租车位的,即使你是本小区业主,你的车辆也不给你开到小区里面。这样做法物业给的解释为“为了安全”。经常是开车带了点重的东西,车只能停在小区外面,硬生生的扛或是抱回来。其实大家都心知肚明,这哪是为了“安全考虑”,就是逼着你去买车位或租车位。大约一年多时间过去,车位已经被卖或租的差不多了,这个时候小区大门的道闸是每天24小时打开了,任何车辆都是可以长驱直入,小区里面道路边停的全都是车。
应该有人反映小区道路边停的全是车辆的问题,物业便采取一些措施。而物业采购的“措施”绝对是用猪脑子想出来的,说是猪脑子想的一点都不过分。他们的做法是在小区道路的一侧离路边大约半米的距离每隔两三米便安装了一个轮胎,本意是不想让车辆停放,这下可以,所有车辆像之前一样靠着轮胎仍然停在路边。你不安装轮胎还好,停车后余下的路还宽一点,这下可好,余下的路更窄了,仅能容一辆车通过。一辆车单向行驶都得要小心翼翼,生怕碰到停在路边的车。你说这样的“措施”能不是用猪脑子想出来的嘛。
小区的保洁不是请保洁公司的员工,应该是物业自己招的临时人员,这样应该付的工资更少。而这些保洁大妈们为了能增加她们的收入,全都是在垃圾桶里捡废品卖。看不到她们打扫卫生,而她们每天忙碌的身影就是在垃圾桶里捡废品。找到物业反映这个问题,仍然是这样。
再来说说这些保安,看保安大爷们的长相,平均年龄不会低于65岁的!65岁的大爷来当保安,能干些什么?!真遇到什么小偷小摸的了,你是能追还是能打呀?每天只是看着这些保安大爷们搬着板凳坐在小区门口呆坐着。
自从上次某地方电动车上楼出事故后,我们这小区电动车也不能上楼充电了。这个是好事,业主们都还是非常去支持的,但是,你把充电桩安装多一点呀!一栋楼就是那么几口充电桩,抢不到充电桩充电是常有的事。另外就是电动车不能上楼了,也没有相应的停车棚,所有车都停在楼栋门口,堵的真是里三层外三层,停在最里面的车有时根本出不来。
前年的时候,我们小区遭小偷了,好几栋楼的住户放在门口鞋柜里比较贵的鞋子被偷了,我家儿子一双耐克也被偷了,虽然一千多块钱,毕竟是旧鞋子,也就没有办法报警,那就去调监控吧!到监控室一看,我滴个乖乖,全小区近百个监控摄像头,只有十来个有画面。为了这个监控的事,我找过物业好几次,物业答复是必须要打什么报告找什么建设局、街道办审批。这都快两年了,还是没有维修。
其实物业有一件事干的比较积极的,那就是收物业费。我们小区电梯卡是有时间限制的,物业费到期,电梯卡也就不能用了,不得不逼着你主动的去交物业费。
我们这物业, 真正做到了“光收钱不做事”!!而且是做到了极致!
还是把电梯卡使用限制时间给破解了!
我所在的小区电梯卡是限制楼层并有使用期限的,物业费到期,那电梯卡的使用时间也就到期,这就让你不得不去主动交物业费。交物业费时,需要把电梯卡带上,让物业帮你重新写卡。而我家从来不用实体电梯卡,携带不方便,都是写到手机NFC卡里,而孩子们我则是给他们写在的钥匙挂件里。而门锁又是指纹锁,所以我们一家人从来没有带钥匙的习惯。
申明一点,我破解电梯卡使用期限,并不是为了想不交物业,而是每年更新手机NFC卡太麻烦,破解之后,一劳永逸!
硬件准备
1.NFC读卡器
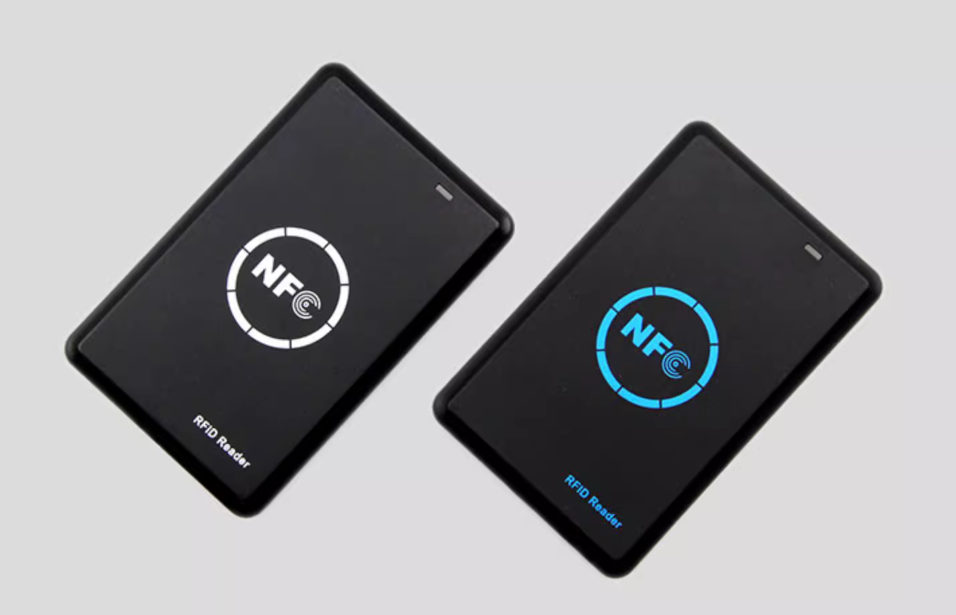
我使用的是如下图的这款读卡器,淘宝上面几十块钱一个,比较便宜。还会送配套的使用软件。
2.IC卡贴
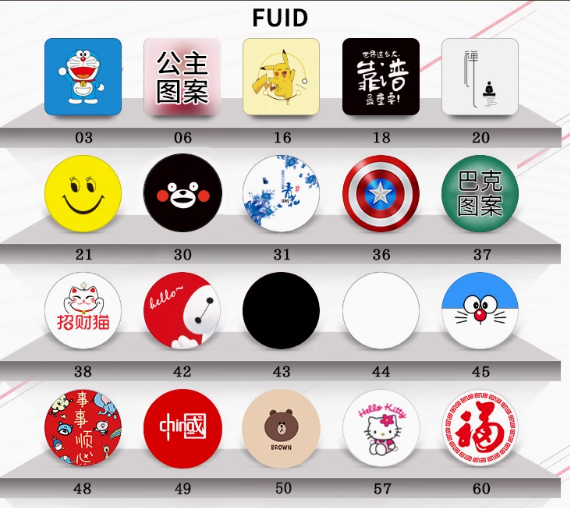 如果手机没有NFC功能,可以使用这个手机IC卡贴,直接贴在手机上使用也是非常的方便。同时也有钥匙挂件,给孩子们用。
软件准备
1.NFC Reader智能解码程序
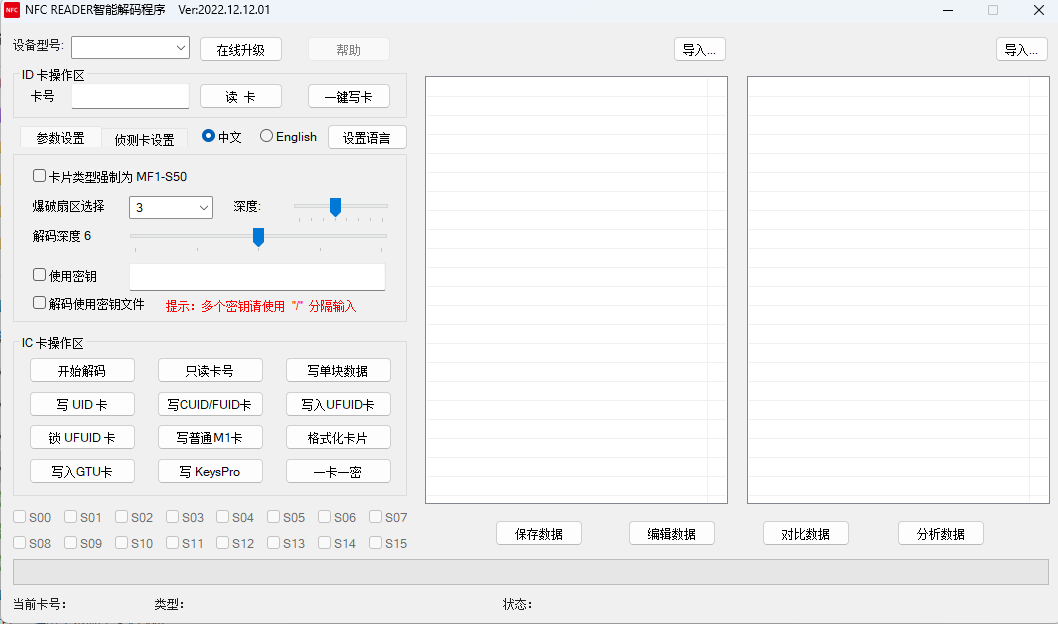
这款软件是购买NFC读卡器随机携带的,主要使用解码、写卡功能、分析数据、对比数据、修改数据等功能。
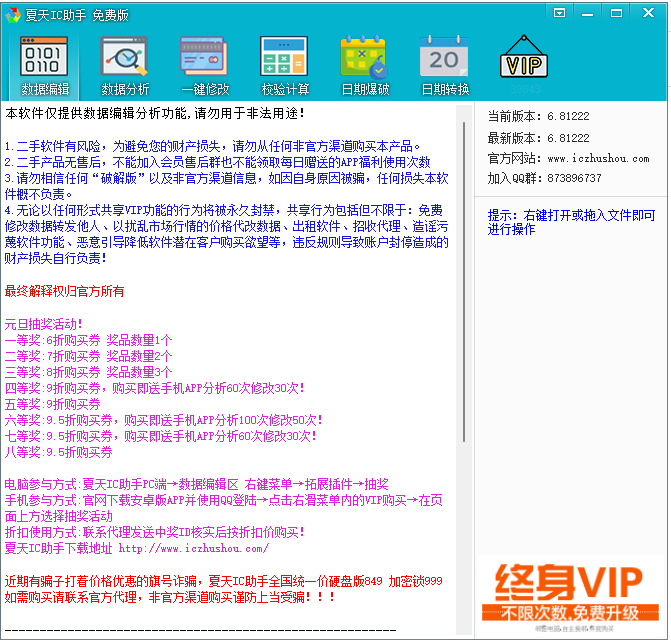
2.夏天IC助手 免费版
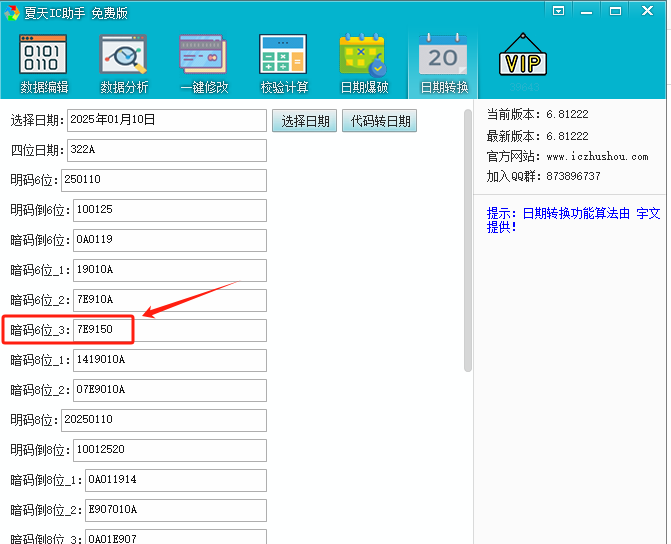
想要下载这款软件的,图片上有官方地址。他的VIP版还是非常贵的,终身版的要999块钱,而计次版的一次就是25块钱。而我使用的是他的免费的“日期转换”功能。
破解过程
(就不去用那面多煽情的词语来形容我艰难的破解过程了,反正折腾了两三个小时)
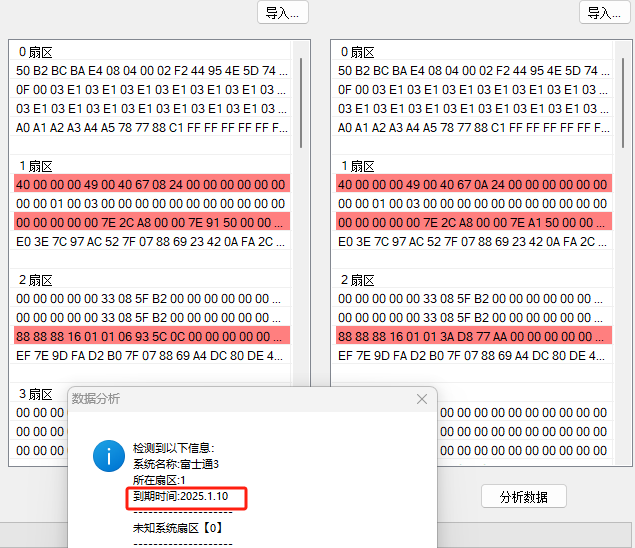
忘提一点了,为了便于比较分析数据,需要有两年的电梯卡数据。以往交过物业费后把电梯卡拿到物业重新写卡后,我便拿回来利用NFC读卡器及配置进行解码。解码后的数据保存为dump格式文件。每年都做同样的操作。
上面这张图片,就是我的2024年和2025年的数据对比和分析,红色部分为差异部分。注意看下2024年数据到期时间为2025.1.10,这个时候我们需要配合“夏天IC助手”里“日期转换”了。
你发现没有,7E9150,在第1扇区第三行!好了,终于被我抓到了!那就简单了,利用时期转换功能,随意修改吧!!把修改后的文件重新利用NFC读卡器写入IC卡、手机NFC卡等里即可!完美破解使用时间限制。
编码算法
最初我以为这个日期的编码算法是网上常见的,结果根本搜索不到。原来这个算法应该是每家电梯卡商都不一样。为了搞明白这套编码算法规则,我请出来Claude,抛出了几十组日期所对应的编码,让Claude帮我算,还是他聪明,没有多会就搞出来了!
完整编码格式:6位十六进制数(XXXXDD)
- 年月编码(前4位 XXXX):
- 基准点:2020年1月 = 7E41
- 每增加一个月,十六进制数加1
- 例如:
- 2020年1月 = 7E41
- 2021年3月 = 7E53
- 2025年1月 = 7E91
- 2028年6月 = 7EC6
- 2030年6月 = 7EE6
- 日期编码(后2位 DD):
- 计算公式:(日期-4)*4 转为十六进制
- 例如:
- 6日:(6-4)*4 = 8 -> 30
- 10日:(10-4)*4 = 24 -> 50
- 28日:(28-4)*4 = 96 -> E0
- 29日:(29-4)*4 = 100 -> E8
完整示例:
- 2028年6月29日 = 7EC6E8
- 7EC6(2028年6月)+ E8(29日)
- 2025年1月10日 = 7E9150
- 7E91(2025年1月)+ 50(10日)
这套编码系统的特点是将年月日信息压缩到6位十六进制数,便于存储和传输。
友情提醒
手机品牌不同,使用方法不同:我老婆用的是OPPO手机,这款手机NFC功能比较好,直接拿电梯实体卡放在手机背面就可以复制到手机里。我使用的是华为手机,直接复制电梯实体卡功能就是无效的,必须要通过NFC读卡器把电梯实体卡解码后再写入手机才可以使用。
另外我同事知道我的方法后,把NFC读卡器拿回来折腾,成功的解码并写入到手机NFC里,但是,电梯实体卡却失效了!
老张博客的2024
年终岁未的常规性动作吧,对一年来博客的文章和遇到的一些事情进行简单的小结与回顾。在2024全年,共计水了50篇“文章”,也正是保持着我这几年来“周更”的习惯。
浏览量超过2K的博文
没了,就两篇,真的只有两篇。在总结2023年博客的时候,《老张博客的2023 》里记录在2023年浏览量超过3K的博文6篇,而2024年超过2K才只有区区的两篇,脸红加流汗呀!流量下降的太明显。不过,对于流量,也不是那么太过于关注了,随之、任之吧。
评论数超过70的博文
- 如何经营好个人独立博客
- 如何有效的博客互访、互评!
- 老张博客搬入软云_RuanCloud,暨谈个人博客服务器的选择!
- 我的“博友圈”
- 万恶的“黄牛”!
- 拿下了zhangbo.net完成ICP及公安备案,正式启用!
- 由“软云事件”想到的!
- 没啥文字功底却总想写点东西
- 中国移动,你是真王霸!
- 收心,回归博客
- 男人做饭or女人做饭?
- 写在老张博客十五周年
- 完美实现手机照片自动上传至NAS并同步到网盘!
2024年全年中,评论中超过70的博文共计13篇,当然,这评论的数量里至少有一半是我回复的,而在2023年全年超过40的才7篇。对于个人博客评论这块,我的观点还是多多评论、互评的,评论是交流的一个主要途径和手段。但是也有人的观点是开评论功能,是想让其他人有机会来“吹捧”。随他们怎么说吧。
2024年“大事件”
在2024年中,我认为对老张博客有影响有两件事,一是《由“软云事件”想到的! 》。有一说一,不吹不黑。期初买了软云的活动机,机器非常的稳定,性价比也非常的高,后来又买了一台常规机。某时软云服务商找我和他合作,免费让我使用机器,而我给他写挂个广告写篇软文,他同时还找了几位博主进行了这样的合作。哪知,最后跑路了!虽然这样的合作只是扶持、只是广告,但是无形当中也等于给他做了“担保人”。很多博友中看着我们的“担保”才去购买的。这样一来,无疑给我们自己的声誉带来了一定的影响。所以,切记找合作商也得要做好甄别!
而另外一件事就是《没啥文字功底却总想写点东西 》。对于“文字功底”这块,我确实是承认我的文字功底不行的,我还在多篇博文里提到。虽然文字功底不行,但是也没有影响我玩博客。直到某天来了一位“高人”对我的博客指指点点,指手画脚,那个时候我还是比较客气。把这件事写在了博客上,引发了广大博友的评论。评论的结果可想而知了,所有的博友一起开始喷这个家伙。最后的结果就是我的博客“被打”到关站。这件事当时对我的触动还是比较大的,曾一度想过关闭博客。不过想来,如果这事现在再发生一次,我会直接对那个家伙爆粗口,“你TM的算老几了,来我这指手画脚的!滚你妈一边去!老子爱怎么写怎么写,想怎么写怎么写!”
2025年“计划”
2025年没有计划,可能没有计划才是最好的计划吧!
对了,今天把“阅读”和“观影”从顶部导航菜单里删掉了。当初做这两个页面的时候,还拿过一段时间的kindle看了二三十本书,现在kindle吃灰了,又没有时间看电影,所以这两个页面也没有存在的必要了。
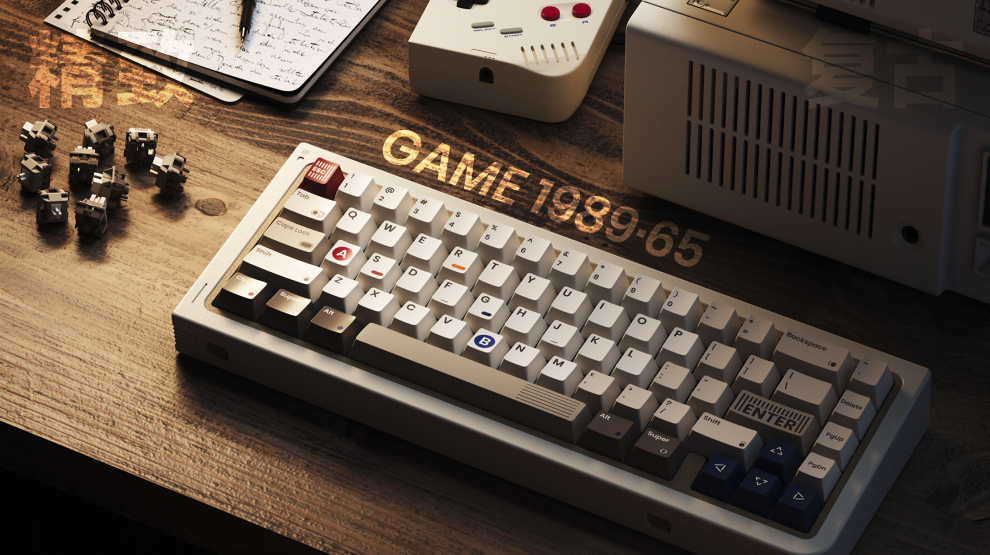
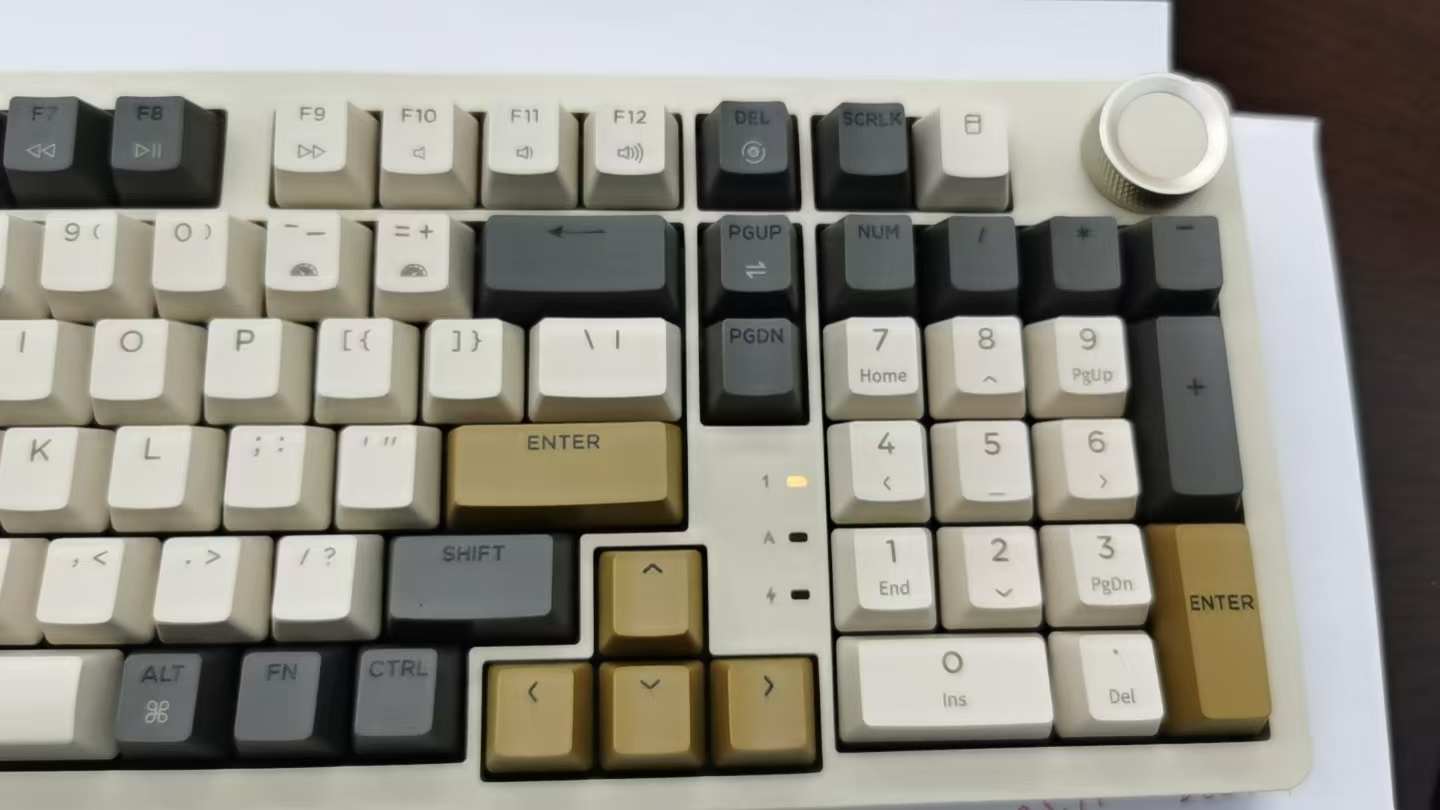
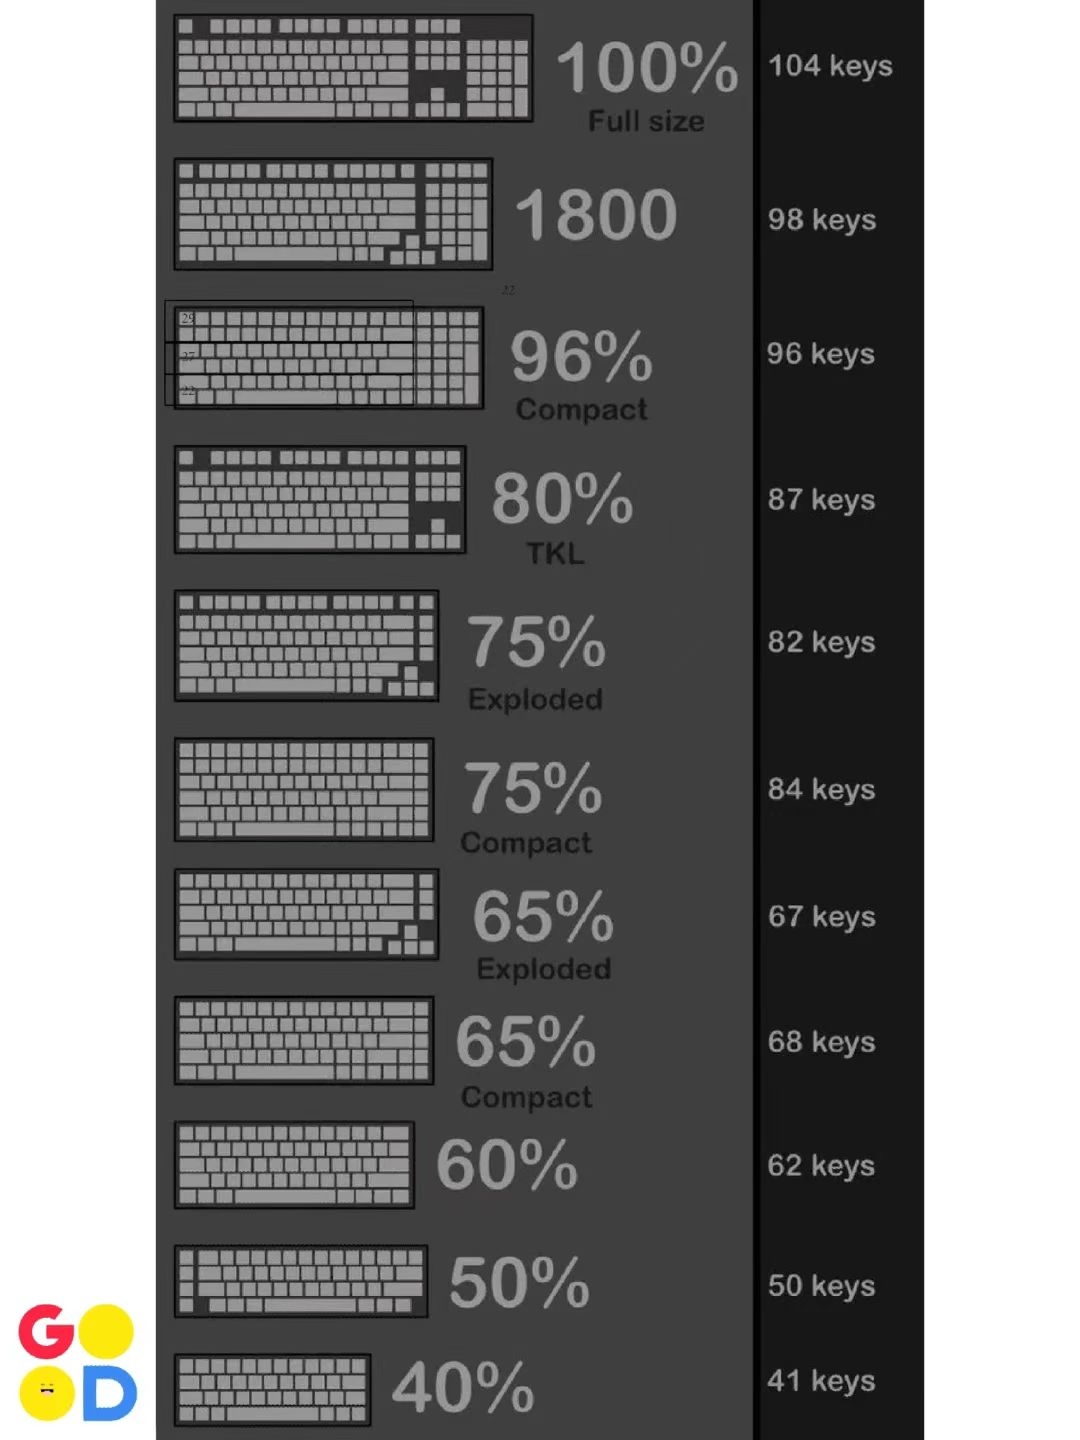
入坑客制化键盘80Retros GB65(GAME 1989)
注:此“坑”非彼“坑”!
接触电脑近三十年,现在才对机械键盘有一点点的了解。通过这几天在张大妈上看各种机械键盘的测评的相关文章,被一些机械键盘的“颜值”真的深深的吸引了,发现我已经掉到机械键盘这个坑里了,估计在钱包的允许范围内,很难再爬上来,不过还得要克制自己,不能冲动消费!
机械键盘,其实追求的“客制化”、“个性化”,三百到一千多的键盘在手感上相差反而不是太大。客制化键盘,也称为定制化键盘,是一种可以根据个人喜好和需求进行个性化配置的键盘。用户可以选择自己喜欢的外壳颜色、材质和图案等。比如,有铝合金材质的外壳,不仅坚固耐用,还具有金属质感和高级感;也有木质外壳,给人一种复古、自然的感觉。还可以在外壳上定制专属的图案、文字或标志,使键盘独一无二。
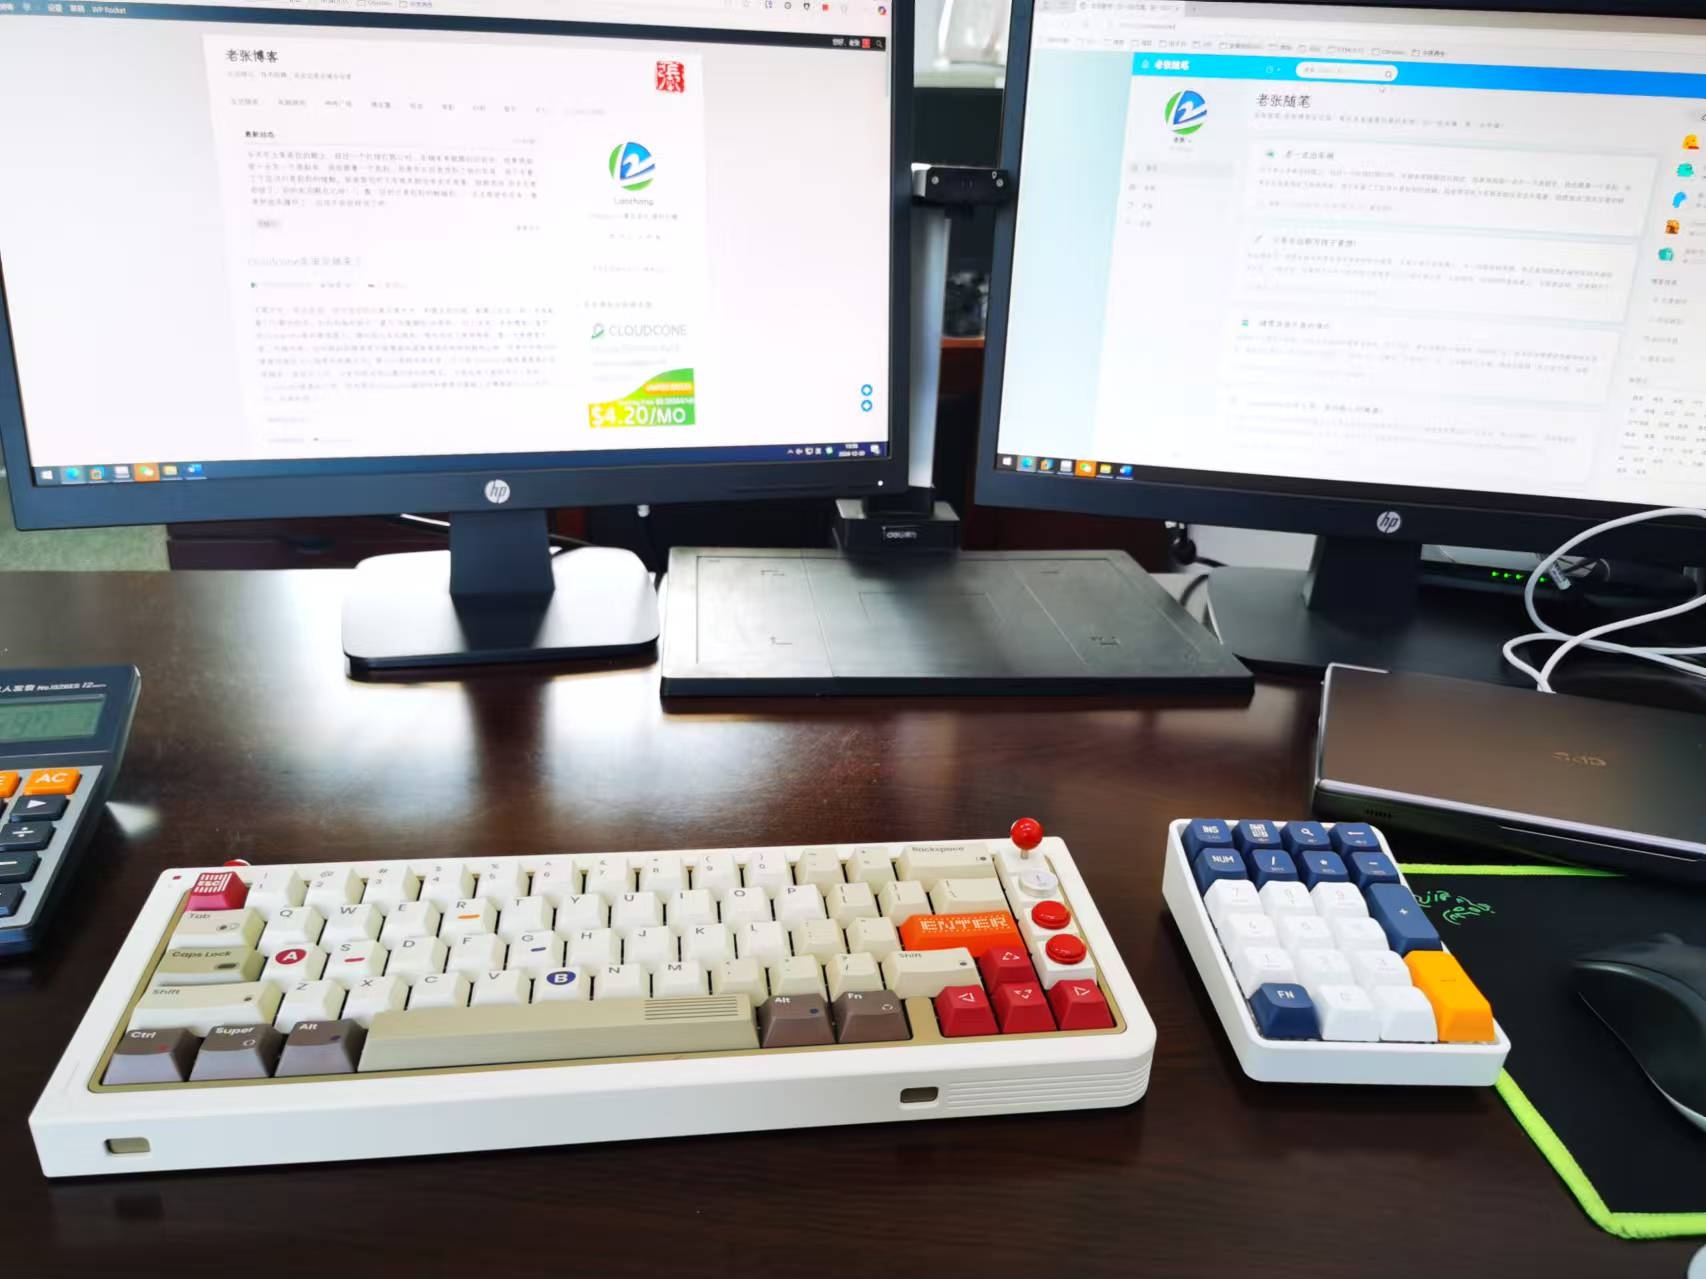
客制化键盘比量产的机械键盘要贵的多,比如我入手的这款80Retros GB65(GAME 1989),套件是1200、键帽289(低配版)、定位板50、官方代组(送轴)50,小算起来就是1589块钱。再加上一些个性的键帽,组好一个键盘也就接近两千块钱了。羞于钱包太瘪,便从海鲜上花了1188搞了一套,是官方代组好了的,另外还送了价值128块钱的街机摇杆个性化键帽。
对于键圈里的大佬,可能更多是看中“个性收藏”,有人家里收藏了二三十把键盘,而这些键盘的价格都是三五千块钱。对于像我这样的工薪人来说,是不敢想的。如果老婆知道我花1188买了一把键盘的话,估计是每天晚上都要“跪键盘”了!
我买的是65配列,为了方便输入数字,又单独买了一个数字键盘,爱国者机械键盘,花了109块!
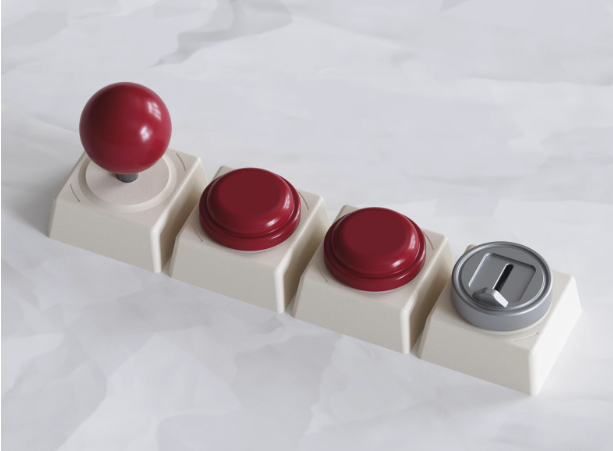
这四颗键帽便是“街机摇杆”,官方售价是128元。在个性化键帽里,这个应该还算便宜的,有些金属键帽一个就是一两百。一个键帽的钱就够买一把普通键盘了!
话说贵是贵了点,但是真的“一见钟情”!卖家给我发的是申通,从大连寄出五天之后我才收到键盘。拿到快递之后迫不及待的打开包装,这个键盘组好之后大概有2GK,话说拿这个键盘干仗,能把人脑袋砸开花。键帽盒子夹了那么多的“猫毛”,一问才知道卖家家里养了好几只猫。那就来给键盘和所有的配件进行了一次“消毒”吧,毕竟是二手的东西,还是注意点好。80Retros这把键盘,不管是在手感、声音上,都要比我前几天买的京造JZ990好的太多太多!

猜猜上面的图片是什么?其实是数字键盘,这个应该说是非常“客制”了!官方售价599!想“客制”就得要舍得票子!看看我的钱包,发现我不能再“客制”了!必须要“克制”!!
cloudcone圣诞促销来了
不黑不吹,实话实说,这次活动的力度不是太大,和黑五在价格、配置上完全一样。所有配置CPU都给的多,而内存相对较小,属于“头重脚轻”的那种。
这几年来,老张博客一直放在cloudcone家的服务器上。通过这几年的使用,两句话说下使用感受。第一句是速度方面,中规中矩,访问网站的速度并不能像国内或是香港的那种线路那么快,但是打开网站的速度还是在可以接受的范围之内。第二句是稳定性方面,可以说cloudcone服务器是真的非常稳定,使用这几年,从来没有出现过意外宕机的情况。
之前也有人提到为什么我的cloudcone速度这么快,因为我在cloudcone稳定性和速度的基础上对博客进行了一些优化,非常的简单,具体可以看《将博客减法进行到底之如何精减WordPress插件》。通过简单的操作,保证可以做到我们的速度一样起飞!
下面是cloudcone圣诞活动配置,有兴趣的可以下手了!
CloudCone 2025年圣诞活动
美国西海岸洛杉矶 MultaCom 机房,千兆带宽,1 个 IPv4 地址,3 个 IPv6 地址,基于 KVM 虚拟,SSD Cached RAID 10 存储。
| CPU | 内存 | 硬盘(SSD) | 流量 | 带宽 | 价格 | 购买地址 |
|---|---|---|---|---|---|---|
| 2核 | 1G | 14G | 3T | 1Gbps | $12.99/年 | 点击购买 |
| 3核 | 2G | 26G | 4T | 1Gbps | $21.99/年 | 点击购买 |
| 6核 | 4G | 55G | 6T | 1Gbps | $38.99/年 | 点击购买 |
| 10核 | 8G | 111G | 8T | 1Gbps | $72.99/年 | 点击购买 |
20.88刀的这款,放几个博客完全没有问题!10.99刀的,可以拿来科学!如果你的Docker容器多的,可以选择37.5刀的那款!
入手京造JZ990,体验机械键盘的快感!
说出来真的有些汗颜呀,自1997年读师范开始接触到电脑,算起来也是“快30年”了,却对键盘真的没有去研究。因为不打游戏,对键盘的唯一要求好像就是能无线就无线,那根线拖在桌子上真的不舒服。这么长的时间里,并没有想着去体验机械键盘的快乐,直到前几天被群里的一群大佬们安利,才想着去了解、折腾键盘。
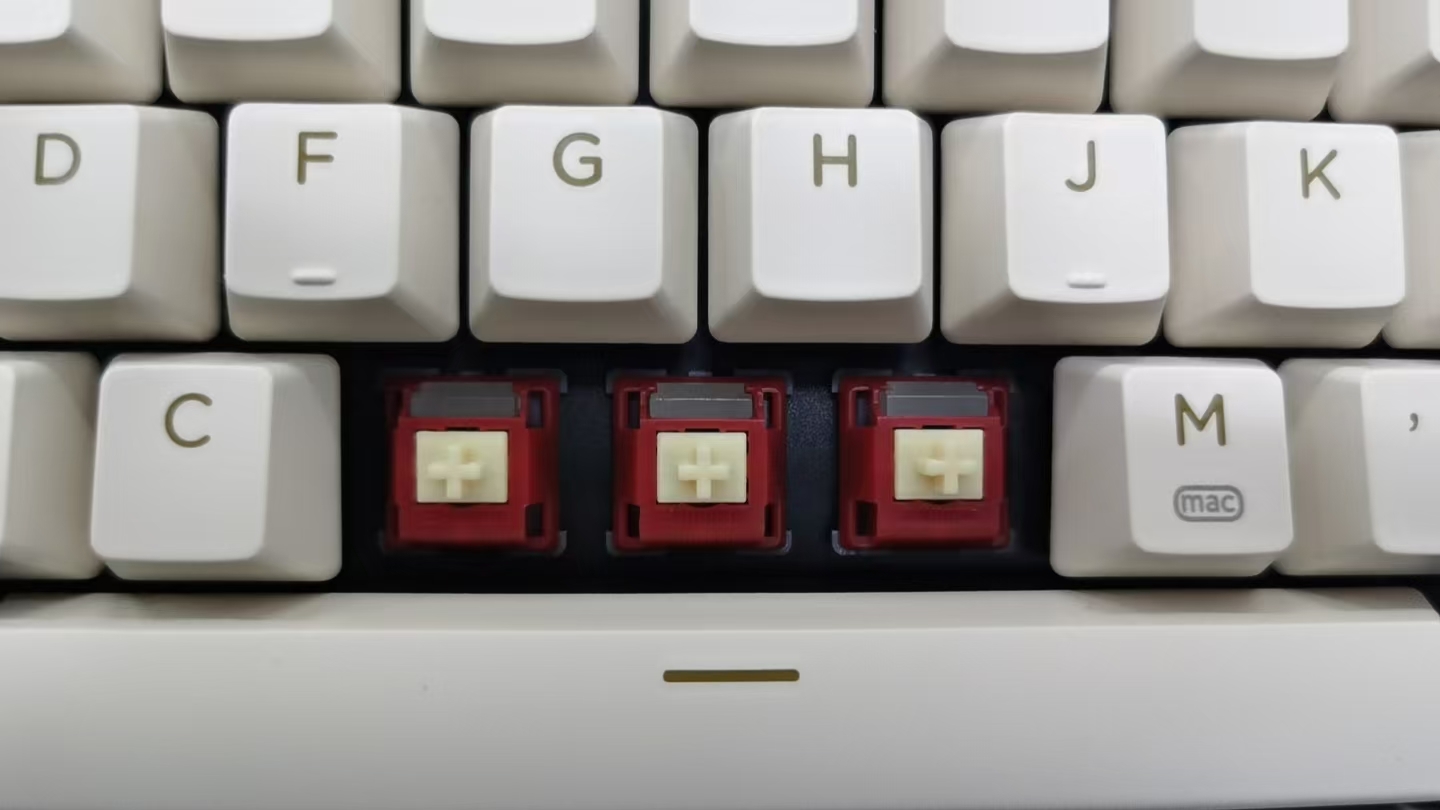
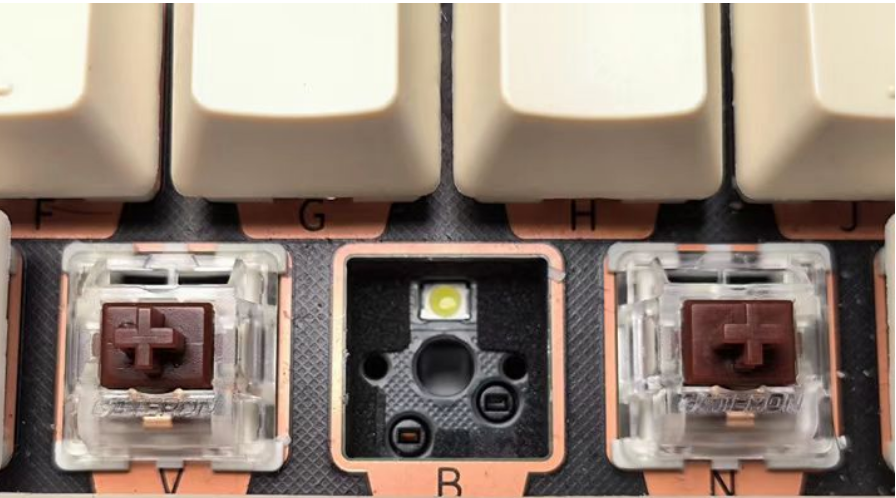
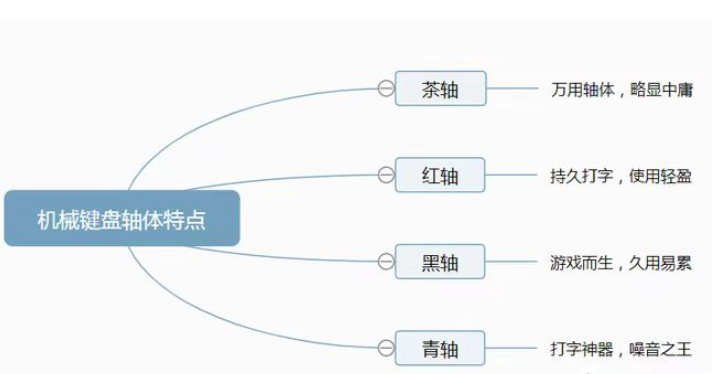
蹬了张大妈两天时间,才知道原来键盘的学问有这么大。想要了解的,自己可以去找张大妈,这里不赘述。在大佬的安利之下,前两天入手了两台京造JZ990键盘,之所以买两台,就是因为以前没有体验过机械键盘,所以就分别买了线性轴和段落轴两种,想来体验体验。
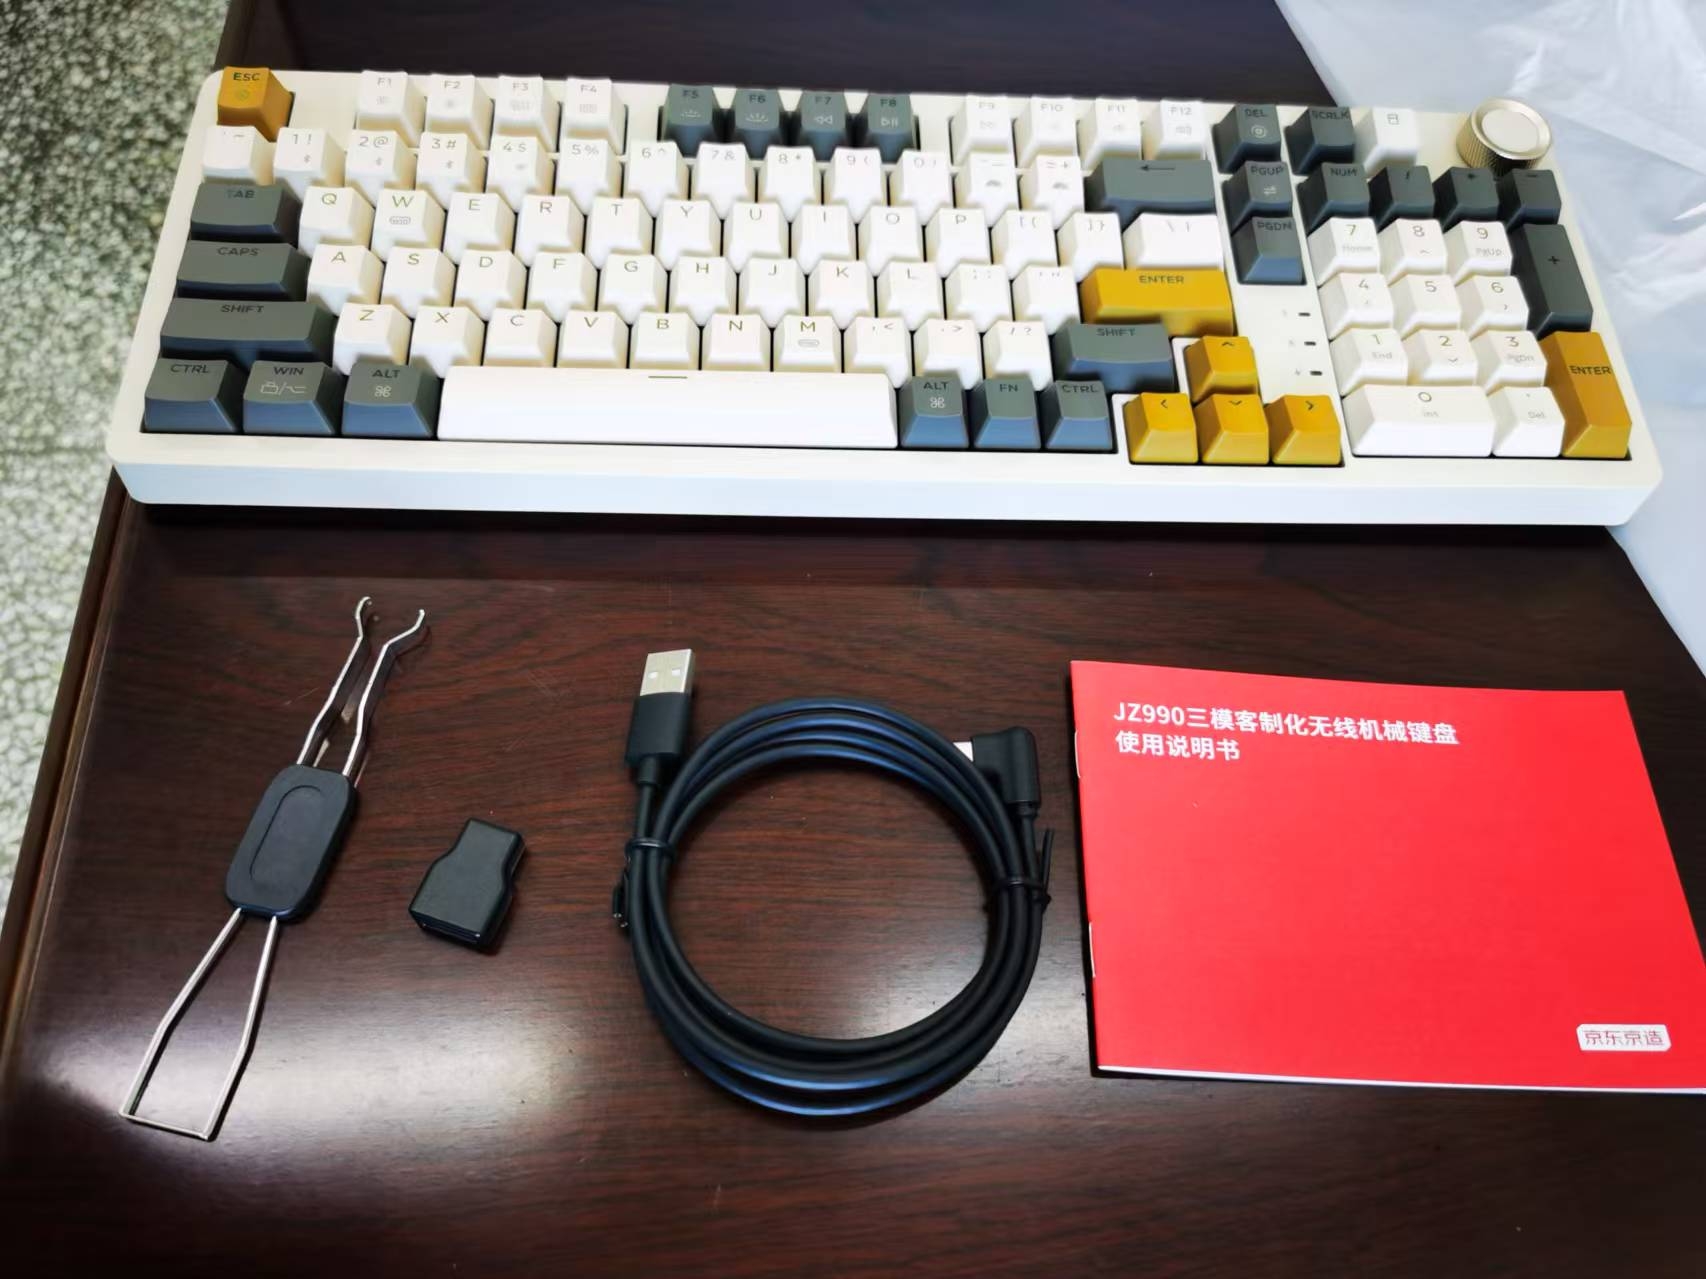
 拿到之后 立马拆箱,到底是机械键盘,真的重。来张全家福吧,送了拨轴拨帽器、USB转换器、线、说明书、键盘本体。送的工具还是比较简陋的。
拿到试试看的心理,把键帽折了几个,和之前有人在张大妈上发的图一不样。后来才知道,我买的是所谓的V2升级版。所谓的“升级”,其实应该是在“降级”,两个版本对比一下,就会发现键帽下面少了铜色的垫和字母标识。
另外一点,就是升经版的DEL键跑到上面去了,对于经常使用DEL键的我来说真的是非常的不习惯。后来找了京造的客服要了固件升级包进行了升级,升级之后DEL功能就跑下面来了,可想而知,这个固件还是老版本的。另外一点值得点赞的是通过驱动软件进行改键后,是直接存到键盘的记忆卡里,也就是不管你把键盘拿到任何一台电脑上使用,都可以起到作用。
其实,这款京造JZ990和贱驴RS2是同款键盘,早期版本标签显示制造商就是“马户公司”,而“升级版”就变成了“京东自有品牌创造设计”。所以早期京造客服直接给你的是贱驴的固件升级包和驱动软件。
现在来谈谈我对这两台键盘的使用感受!如果不把这两个键盘放在一起敲击,基本上不会感觉到有什么区别。
茶轴的声音小,敲击时感觉到有些绵柔有一种丝滑的感觉,而玫瑰拿铁轴的声音相对要大一起,敲击的时候感觉有点像我之前用过的质量较差的键盘,敲击的时候感觉有些卡顿不顺当,。两种键盘不放在一起充分比较,单独使用的时候根本没有这样的感觉。相对来说,我感觉茶轴手感好但是声音小;而玫瑰拿铁轴的声音大而好听,听起来特别有感觉,但是手感不是太好。细品起来,两个手感又差不多了。呵呵,但是两种空格键的敲击声音和手感都是很是太好,声音是那种铛铛的就像敲小木棍的那种感觉,非常的不好。可能是我的手感太“钝”,和广大的小测评文章写的手感不一样。不管怎么样,测评就是测评,每个人的喜好也不一样,自己感觉好就行。
一入键盘深似海呀!看到了网上很多有个性的机械键盘就想入!正如大大的小蜗牛所说,玩键盘和摄影、钓鱼是一样的,是个无底洞,可能我已经掉没洞底了!
再建“一个人的论坛”,体验折腾的快乐
2000年工作以后就接触网络,沉迷于中。2003开始搭建网站,最初以dedecms建的娱乐网。其中内容涉及笑话、美图、在线小游戏等,当然都是采集的。当QQ农场大火之后,想着如何来建QQ农场,记不得是一年了,发现DZ论坛里有QQ农场这款插件,便着手搭建论坛。那个时候QQ农场还需要收费,而我的论坛各种游戏全免费,吸引了很大一批用户。当时论坛在QQ农场、牧场以及无心宠物游戏积分与论坛积分互通的基础上,带动了论坛的发展,经过数年的发展,注册量达数万,日IP过千。另外一个论坛是和一位网友合开的“雷友论坛”,这位网友会编程,开发出了当时可以自动刷迅雷积分的一个软件。通过这款软件,论坛聚集了大量的注册用户,鼎盛时期的流量也是非常的可观。上面说的两个论坛后来因为QQ农场的普及、迅雷的没落等而慢慢失去人气。后来在“QQ时空”论坛做超版、也在本地的地方论坛做过管理。可以说,建论坛、管论坛的经历至少也有五六年的时间。 论坛创建容易,但是想要把论坛经营好真的是需要方法。论坛必须要有一个实质性的东西能吸引住大家。论坛建好之后,其实只是做好了一个框架,坛主得要给论坛以灵魂,用户再给论坛注以血肉,这样论坛才会像一个活生生的人呈现在你面前。一个论坛的发展,你必须要有一个“亮点”、要有一个发展的方向,用亮点来吸引人,在你的方向上去发展。也就是说,用亮点来引流。比如我前面说的两个论坛,就是靠免费的QQ农场和迅雷积分这两个亮点来吸引流量。
每个人都是有“虚荣心”和“荣誉感”,应该以这个为契机来让用户参与进行、互动起来。泡论坛和“砍传奇”是一样的,砍传奇是通过砍小怪升级、打BOSS爆好装备,而泡论坛就想过通过发帖来提高等级、通过发优质帖等来获取勋章等。这就是为什么有很多大型的论坛UID、勋章、特殊会员组等能卖到好几百甚至几千块。
对于建论坛这块,我明明知道自己拿不出来什么东西来吸引人,但还是去折腾了,只是想体验下折腾的快乐罢了。前两年经常泡“非主流论坛”,知道非主流论坛是用“修罗”程序后,就着手自己折腾了一个。花了很大的精力在上面,折腾了有两三个月,当然也花了不少钱买了主题和一些插件。对于“修罗”论坛,作者在好多年前就不更新了,导致PHP版本还停留在7.3,另外就是一些好用的插件基本上都收费,找插件花了大量的时间,折腾折腾也就没有热度了。
这段时间经常泡nodeloc论坛,又开始折腾Flarum了。花了一个星期这样的时间,我的“一个人的论坛”功能就初步建成了,https://bbs.laozhang.org。用修罗折腾两三个月,而用Flarum只折腾了一个多星期,这应该利益于Flarum知名度要大、各类插件丰富;另外就是有一群小伙伴,比如https://sx.sd/的热心帮忙与指导;当然,最后还是利益于AI,遇到很多问题,通过AI就能够在较短的时间内完美的解决。
一个人的论坛建好了,Flarum后台也熟悉了,各种插件的功能也了解了,那么接下来就是吃灰了!明知建了论坛没有人气,但是还是折腾了,就是想检验下Flarum、检验下折腾的快乐罢了!
Syncthing多端同步神器win版SyncTrayzor安装及升级内核方法
我在使用Obsidian笔记软件折腾文件同步的时候遇到了多端同步神器Syncthing,在《Obsidian多端同步终极大法Syncthing、备份终极大法Kopia》只是简单的提及一下,至于安装、使用方法并没有过多的去阐述,毕竟官方文档介绍的非常的清楚。我使用Syncthing网络环境是这样的,在办公室的服务器上安装了Docker版的Syncthing,而在家里台式机、办公室台式机、笔记本上则是安装了有GUI界面的SyncTrayzor,在win环境下有系统托盘图标,使用非常的方便。
SyncTrayzor官方文档也有推荐,详细请看官文档https://docs.syncthing.net/users/contrib.html,呵呵,其实也就是一句话介绍。SyncTrayzor的项目地址在https://github.com/canton7/SyncTrayzor,细心的朋友应该会发现,SyncTrayzor最新1.1.29版还是2021年8月份发布的,由于长时间项目没有更新,导致Syncthing从1.28.0升级到1.28.1时不能自动更新。这里老张告诉大家如何在Syncthing更新上避坑,毕竟因为这个升级,周六折腾了半天的时间。
SyncTrayzor版本选择
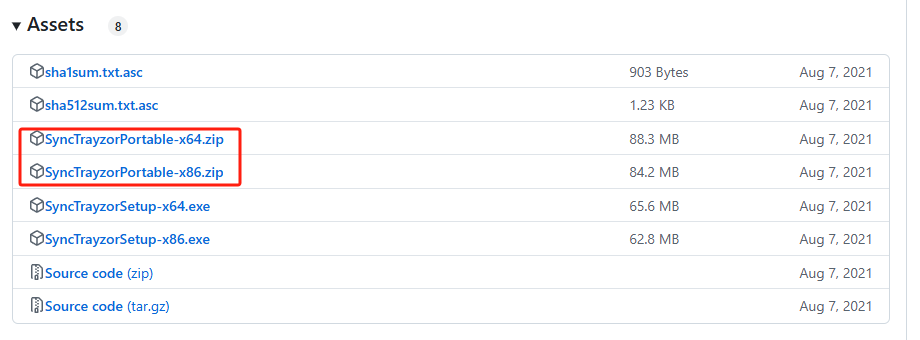
SyncTrayzor版本我们选择绿色解压版,即SyncTrayzorPortable-x64.zip或是SyncTrayzorPortable-x86.zip,这两个版本亲测在win11上均可完美运行,不要下载安装版,安装版手动更新Syncthing无效。
更新Syncthing
到syncthing的项目地址https://github.com/syncthing/syncthing中下载最新版1.28.1,我们选择syncthing-windows-386-v1.28.1.zip这个版本,解压后将所有文件复制到SyncTrayzor目录的data文件夹下即可。OK,完成升级!SyncTrayzor的安装版没有data目录,即使把升级文件复制到根目录也不成功。
其他推荐syncthingtray
昨天折腾的时候又发现一款Syncthing的win版项目syncthingtray,这个项目更新的更是比较频繁,也安装试用了,但是GUI真的不是太喜欢!有兴趣的可以试试!
使用避坑
在同步文件设置的时候,文件夹ID不要设置为sync。昨天在折腾的时候我无意将文件夹ID设置成了sync,结果发现“全局状态”的文件及文件夹数量是实际数量的两倍,同步进度条只能到50%。(实际是同步完了)
闺女又梦游了!
闺女现在七岁了,早就过了分床睡的年龄,但是一直没有敢让她一个人单独睡一个床,原因就是闺女会梦游!
闺女梦游早就有发现,那个时候还没有到闺女分床的年龄,闺女在我们的大床上睡。那会还是夏天,夜里大概是一两点的样子,我们两口子都听到有什么动静,起来一看闺女站在床头和卫生间门中间,问她话是不是起床尿尿的,也不回答。过了那么几秒我正准备起床看看的时候,闺女立马爬到床上嘴里还叽叽咕咕的倒头就睡。第二天早上问闺女说有没有起床尿尿她却说不知道。
大前天的晚上,我带着闺女在她的小床上睡,闺女睡在靠墙的那面,睡到半夜的时候感觉到闺女从我身边爬下了床,我立马问起床干什么呀,结果闺女也不回答,在床头站了有几秒钟后又爬回被窝里倒头就睡,嘴里也还是晃叽叽咕咕些听不清的话。早晨起床后我问闺女说你昨天晚上起床干嘛,她却说一觉睡到天亮!
这是两次下了床走动的梦游,而像睡着睡着突然坐起来叽咕几句话后再倒头睡的现象就比较频繁!
闺女这么大了,其实早就应该让她独立着自己一个人睡,但是因为梦游却不敢让她一个人睡,很多新闻报道都有提到过因为梦游而发生了一些不该发生的事。原来想着到晚上把大门反锁后,再让闺女一个人睡,但是还是不放心。
睡眠行走的病因有哪些? 目前的研究结果表明,可能与睡行症有关的因素包括: ·睡眠不足或睡眠紊乱:睡眠剥夺、长期熬夜、反复倒时差等不良的睡眠习惯可能会引起睡行症。·精神因素:生活压力大、情绪压抑、创伤后应激障碍、惊恐障碍、长期处于焦虑状态或患有焦虑症,也会增加发生睡行症的风险。 ·阻塞性睡眠呼吸暂停:未经治疗或刚开始持续气道正压治疗的阻塞性睡眠呼吸暂停。 ·饮酒。 ·神经性疾病:偏头痛、颅脑创伤、脑炎、癫痫等疾病可能会导致睡行症。 ·遗传:睡行症人群的家庭成员也容易患此病,研究表明可能与遗传有关。目前有学者提出遗传倾向的假说,一些研究也确定了不同的基因位点和遗传模式。
这些是我从网上找的梦游的病因,又单独问了AI“七岁的孩子梦游怎么回事”,它的解释还是比较合理的:
一、生理因素
- 神经系统发育不成熟
- 七岁孩子的大脑仍在发育过程中。在睡眠期间,大脑对身体的控制机制还不够完善。大脑中负责抑制运动行为的神经通路可能尚未完全成熟,使得在睡眠阶段,尤其是深度睡眠阶段,身体的运动抑制机制失效,从而导致梦游。就像一个尚未完全搭建好的 “指挥系统”,在睡眠时偶尔会出现 “指挥失误”,让身体做出行走等动作。
- 睡眠周期特点
- 儿童的睡眠周期与成人有所不同。七岁孩子深度睡眠时间相对较长,而且在睡眠周期转换过程中,大脑的状态可能不够稳定。在从深度睡眠向浅睡眠转换或者在深度睡眠期间,容易出现梦游现象。例如,孩子在入睡后的前 2 - 3 小时内,当处于深度睡眠阶段,大脑可能会错误地触发运动指令,导致孩子起床梦游。
二、心理因素
- 压力和焦虑
- 七岁的孩子在学校或家庭环境中可能会面临各种压力。比如,在学校里面临学习任务的压力,像要学习新的知识、完成作业等;或者在与同学相处过程中产生社交压力,如担心被同学排斥等。这些压力可能会在孩子的潜意识中积累,在睡眠中以梦游的方式表现出来。
- 家庭环境的变化也会给孩子带来压力。例如,父母争吵、家庭新成员的加入(如新生儿诞生)或者搬家等情况,都可能使孩子感到焦虑不安,进而引发梦游。
- 过度兴奋或疲劳
- 如果孩子在睡前进行了剧烈的运动,如奔跑、跳跃等,或者看了刺激性的电视节目、玩了令人兴奋的游戏,大脑会处于高度兴奋状态。入睡后,这种兴奋状态可能会干扰正常的睡眠进程,增加梦游的可能性。
- 长时间的疲劳也容易导致梦游。比如,孩子参加了一整天的户外活动,身体和大脑都很疲惫,晚上睡觉时就可能会出现梦游现象。
三、其他因素
- 疾病或不适
- 孩子如果生病,特别是发热,会影响大脑的正常功能。当体温升高时,大脑的代谢和神经信号传导可能会发生改变,从而诱发梦游。
- 胃肠不适,如胃食管反流,也可能会干扰孩子的睡眠。胃酸反流刺激食管,会产生不适感,这种不适感可能会在睡眠中引发身体的异常反应,包括梦游。
- 睡眠环境改变
- 新的睡眠环境可能会引发梦游。例如,孩子外出旅行换了新的住宿地方,或者房间的布置发生了较大的变化,如更换了新的床铺、重新摆放了家具等。这些环境因素的改变可能会让孩子在睡眠中感到不安,从而导致梦游。
这里面的第二大条和第三大条应该可以排除,最有可能的原因就是第一大条的第一小条“神经系统发育不成熟”。我想着如果接下来的时间梦游的频率增加,准备带闺女去南京儿童医院去看一看了!
唉,还是比较愁人的!
捉鼠记!
要是放在以前,你打死我八顿我也不会相信16楼会有老鼠!
第一次发现县城16楼的家里有老鼠还是在七八年之前。那个时候学校有孩子住校,每周二晚上我需要在学校值班,周三凌晨三点就要到县城大的菜场去监督采购小组买菜。有那么某个周三上早上,我五点多到家之后发现客厅的地面上有很多小小的像小鸟的“血脚印”,仔细观察才确定应该是老鼠的脚印。想着这个老鼠是怎么进家里来的呢,原来是客厅的空调孔没有堵,应该是从这里钻进来的。于是全家出动到处拿东西敲打也没有发现老鼠,估计已经跑到户外去了。赶紧把空调孔给堵了!
这件事也就这去了,可是没过多长时间,家里客厅的七八个孔灯全都不亮了,找维修工来排查发现是电线断了!电线断了!再次确定,原来老鼠把中央空调的风道咬坏跑进了吊顶上把电线咬断了。必须要“灭鼠”,于是在空调风道外放了老鼠药,没过几天,房间里就有臭味,老鼠不知道被药死在哪里了!当时卖老鼠药的老板保证说老鼠吃了药后不会死在房间里,NND,被骗了!房间里臭了有五六天,最后在空调风道里面找到那只死老鼠!恶心死了!
我家的窗台是向外伸了一些,安装了防盗窗后在窗台上用塑料箱子装了土可以种些小菜什么的。前段时间老妈种了一些香菜,明明香菜长出了很高,可是不过两天就不见了!最为严重的时候种的大蒜也不见了好几颗,而且土地被挖了好多个小坑!不用说,一定是老鼠干的!还好这次老鼠是在户外,没有进家里来!
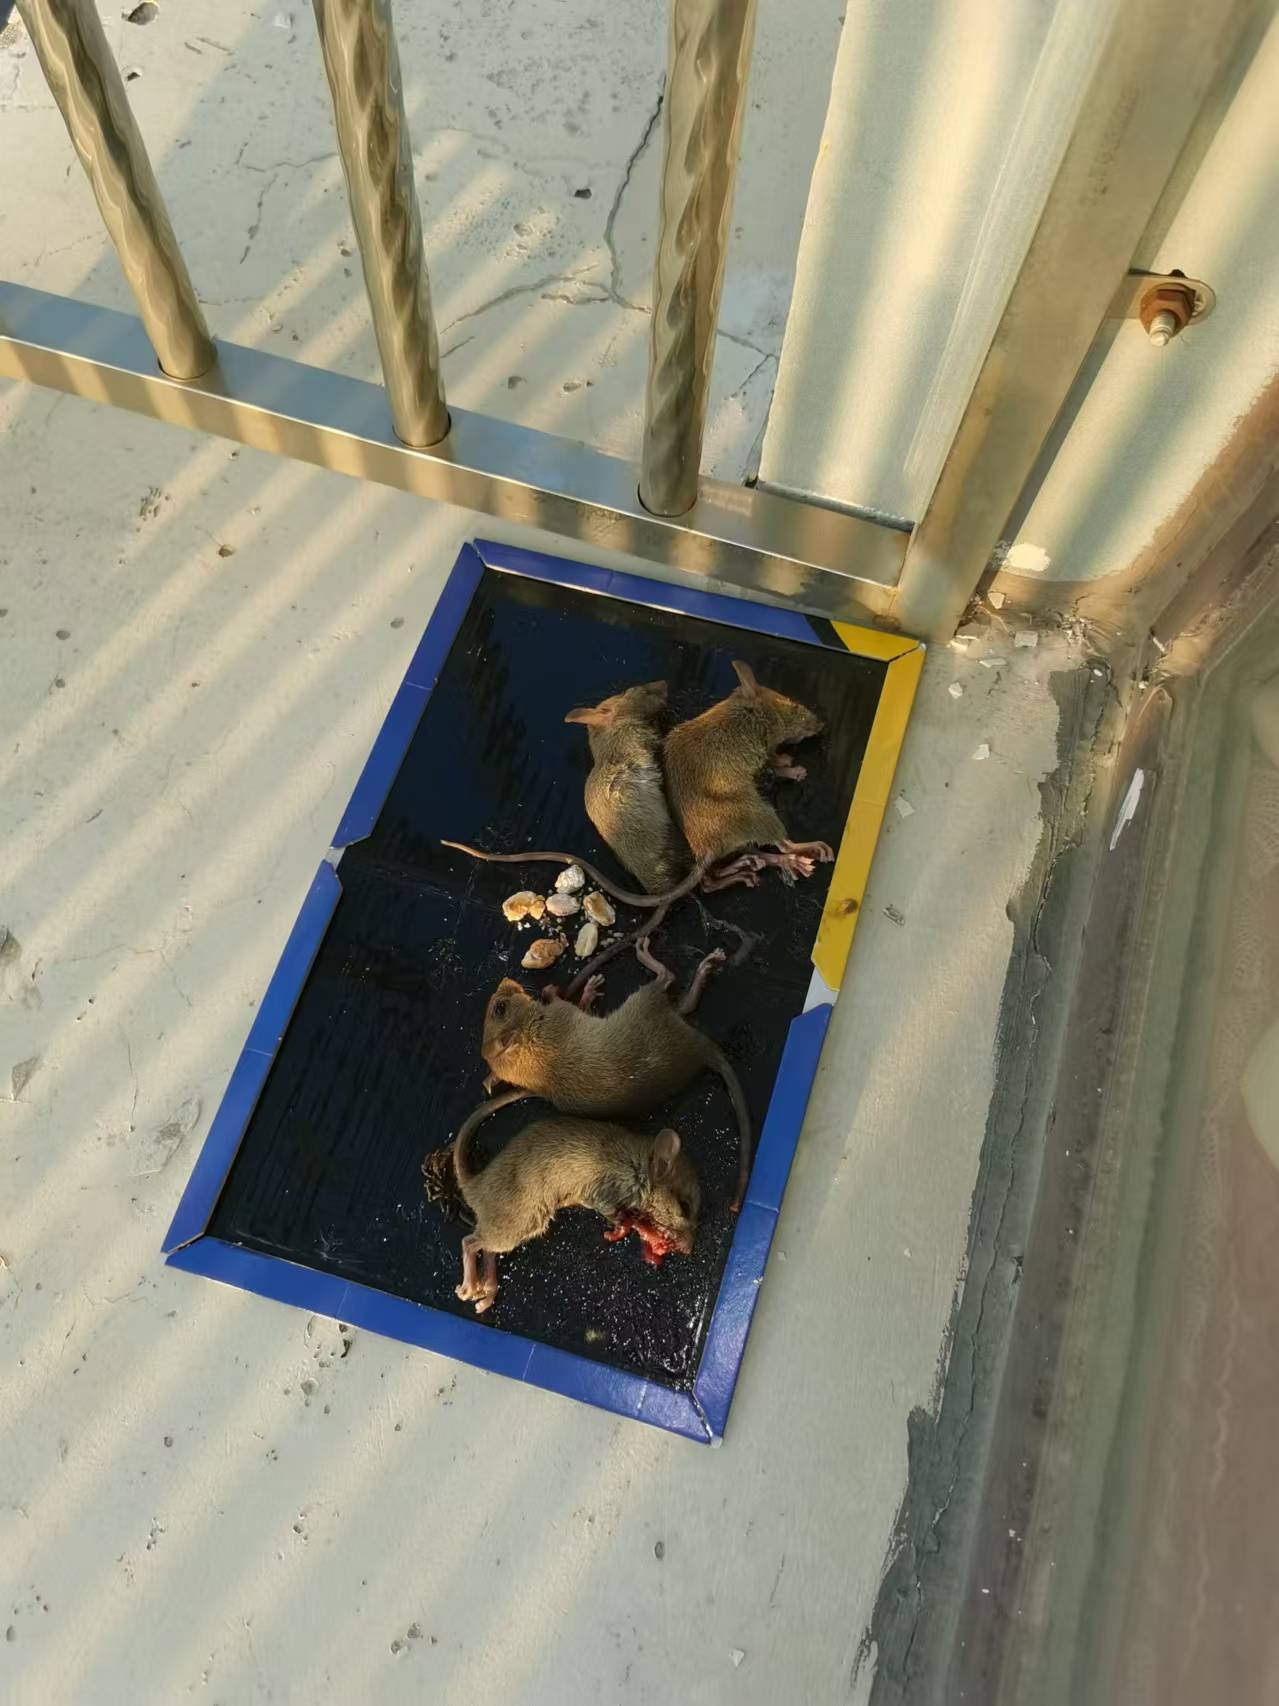
鉴于上次“灭鼠”的经验,这次决定用粘鼠板,花了三十来块钱买了10张。第一天在户外窗台上放了4张,第二天早上发现只有3张了,有一张不见了!真的不见了!估计应该是粘到了大老鼠被拖跑了!第二天把那张给补上,当天晚上还没有睡的时候就听到窗外有老鼠吱吱的叫声,打开窗户一看,那张才换的粘鼠板上粘了三只老鼠。想着也不急着处理,第二天早上换掉吧!你猜怎么着,第二天早上再次一看,又多了一只老鼠!一共粘了四只老鼠!
自那以后,种的香菜、大蒜可以快乐的生长了!
利用雷池WAF,把博客“搬回家”!
 这几天在折腾雷池WAF,其实还是很好折腾的。我在《把服务器“藏”起来,让网站快起来!》可能说的不是太直接了当,后来又重新上了一张图,这样看起来更加一目了然。当然,还得要说下硬件环境,就是从海鲜上花了三四十块钱买了阿里云香港轻量24元每月的那款VPS安装雷池作为前端,而后端同样需要采用香港的VPS,这样速度才可以真正快起来。
 今天就来折腾折腾怎么利用雷池WAF,把博客放在家里的服务器上。
首先介绍下我的硬件环境,家里一台J4125配置了16G内存、1T固态硬盘、4T机械硬盘,这台做成了all in one。ESXI虚拟机做底层,虚拟了爱快做为主路由拨号、Op旁路由、黑群晖,前几天又才折腾了一个debian安装了宝塔准备放网站。网络环境同家里500M电信,上行是40M、公网IP。而外部网络环境就是从海鲜上花了三四十块钱收的阿里云香港轻量24块钱每月的那一款。首先来上个图吧!
 博友们访问博客首先向安装了雷池WAF阿里云香港轻量发送请求,由雷池反代后再直接访问了家里的虚拟机上的博客。是的,路线是绕到香港去了,但是这条路线是优质线路,速度方面并没有感觉到慢。下面来说说设置方法吧!
设置动态域名解析、端口映射
家里有公网IP,但是是动态的,每次重启光猫后IP就会变化。我这里是从爱快上设置了动态域名解析,网上教程很多,不再赘述。把相关服务的端口必须要映射出去,这个也是在爱快的操作。
设置域名解析
网站的域名解析IP设置为安装雷池WAF的那台香港轻量。
雷池WAF设置
首先申请证书,傻瓜化,会点鼠标就行;然后就是添加站点。
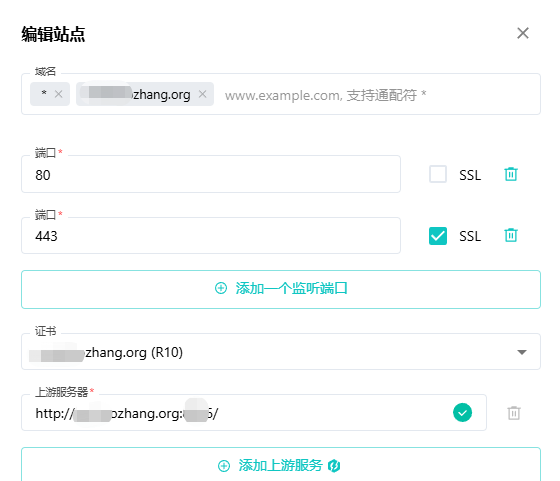
域名填写你网站的域名;证书选择你刚才申请的证书;上游服务器填写你动态域名解析的那个域名+网站映射出来的端口,如:http://xxx.laozhang.org:5425/
完成以上操作后,你就可以不需要加端口号直接使用域名访问家里虚拟机上的网站了!怎么样,即没有端口号、速度也不慢、还有雷池WAF安全保护,不是美滋滋!
把服务器“藏”起来,让网站快起来!
网站给用户最好的体检就是速度要快,想要网站速度要快,可以把域名备案选国内的服务服务器。但是大家都知道域名备案后把网站放在国内后续会有很多问题。所以很大一部分人就干脆放弃了速度而选择把服务器放在海外。把服务器放在海外,也可以选择对大陆优化的线路,但是这样的线路成本是非常的高。
阿里云香港轻量,那个速度真的是杠杠的,谁用谁知道。但是,24元每月的那款配置只有2C1G的,说真的1G内存真的有点太小了。34块钱每月的配置是2C2G,这款拿来做站还不错,一年408块钱虽然可以接受但是感觉还是有点高。最为重要的一点就是听不少人说阿里云香港轻量虽然线路非常的好,硬件性能却非常的拉,安装个Docker都会把CPU给干爆了。阿里云发放的学生300元优惠卷,用这个卷可以买到一年的2C1G的那一款香港轻量,海鲜上这个卷最初卖30块钱,后来9月中旬新卷被阿里指定商品后老卷涨到了70元,也就是说70块钱可以搞到阿里云香港轻量2C1G款一年时间。
那怎么样花最少的钱让网站的速度飞起来呢,这里老张来谈一谈怎么样花最少的钱让网站的速度最大化。请出今天的主角,雷池WAF。
雷池WAF:网站防护软件,它本质是一个反向代理,架设在网站前面,可以灵活设定各种规则,对所有请求进行过滤,不让黑客"越雷池半步"。它底层基于 Nginx,自带图形操作界面,简单好用。它的核心是智能语义分析算法,用来判断可疑请求,相当于一层自定义的软件防火墙,它在 GitHub 已经收获了12.5K star,目前是全球排名第一的开源 WAF 项目。它可以自己架设,很适合个人和小企业使用。如果你需要防护暴露在公网的 Web 服务器,不妨用它试试看。
目前我准备的方案是阿里云香港轻量作为前端,安装雷池WAF;后端采用HH家的香港性能机(去年黑五推出的一款2刀一个月可以搞到2C6G的香港VPS。),安装宝塔做网站。通过雷池WAF,把阿里香港轻量和HH香港性能机组合起来,既有了HH机器的性能又有了阿里香港轻量的速度,同时还多了一层安全保护。至于花费嘛,和34元每月的阿里香港轻量差不多,但是性能得到了提长、防护上有了保障。
雷池的安装、设置非常的简单,不做赘述。这里给大家避一个坑,我在把甲骨文新加坡VPS的两个小破站做雷池WAF反代的时候,出现了一个问题,只要通过雷池反代,wordpress的CSS文件就加载不出来,。AI给出的解释如下:
在使用雷池进行前端代理和后端反向代理时,老张遇到了WordPress样式丢失和后台无法访问的问题。初步分析认为是SSL跳转的问题,但检查后发现实际上宝塔配置没有问题。更深入的分析显示,网站在反向代理期间,由于回源使用HTTP协议,导致WordPress误认为站点也是HTTP,从而加载了错误的资源(CSS、JS等),最终导致样式丢失和重定向过多的错误。
为了解决这一问题,建议采取以下步骤:
- 确保前端使用HTTPS,回源采用HTTP:这样可以利用Cloudflare(CF)的证书,免去直接在源服务器上处理SSL证书的烦恼,简化维护和更新。
- 更新WordPress配置:在
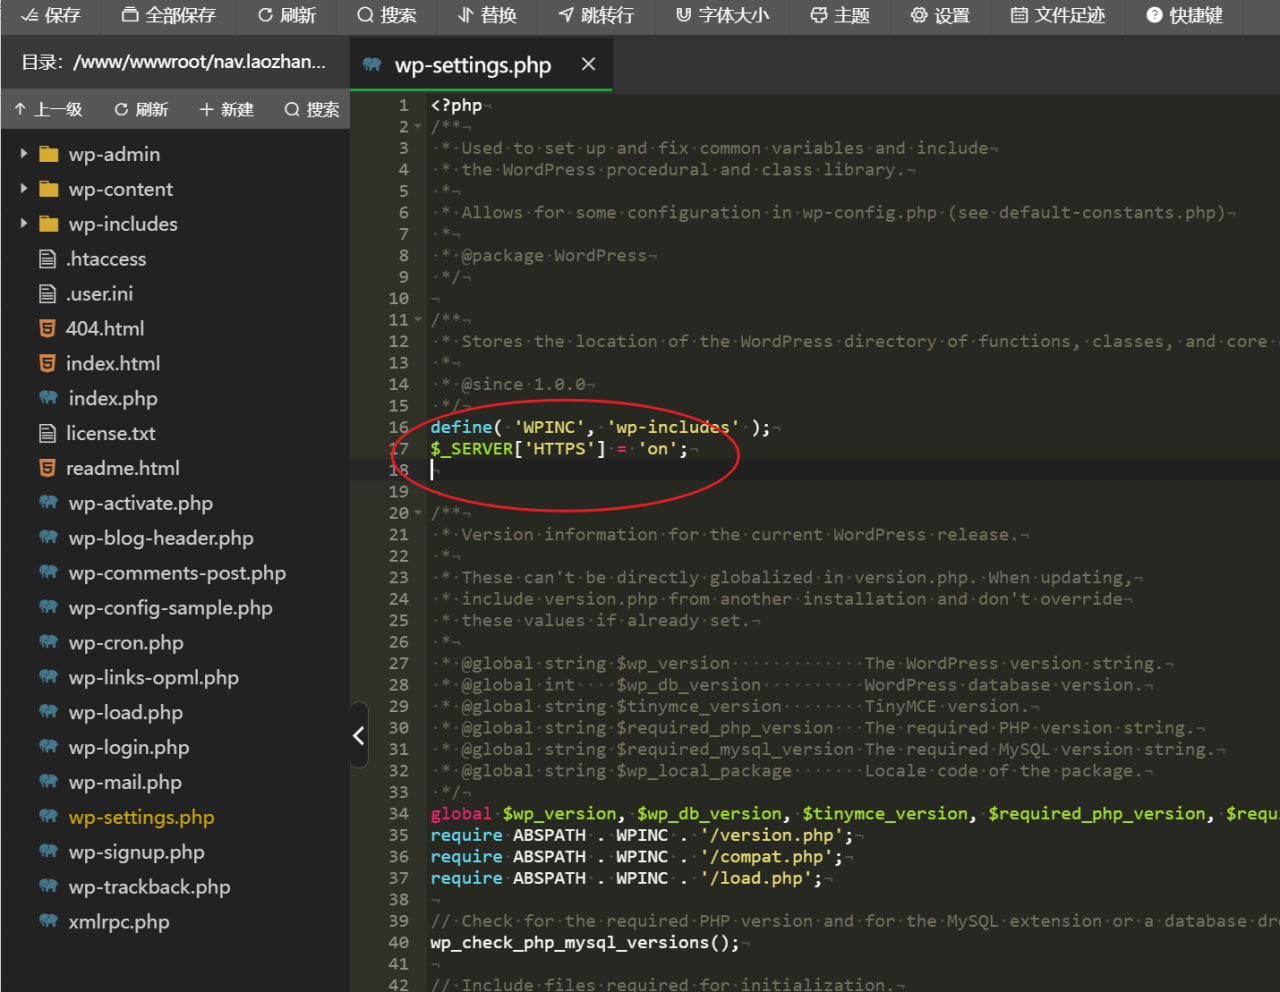
wp-settings.php文件中添加$_SERVER['HTTPS'] = 'on';一行代码,以强制WordPress将网站协议识别为HTTPS,这样可以防止出现HTTP资源加载的问题。通过以上方法,最终达到了正确加载资源并解决了访问问题,确保了WordPress的正常运行。
具体原因可以看NL论坛坛主的文章分析《WordPress 反代后,css丢失或者后台进不去的问题的解决》,解决的方法是编辑 wp-settings.php ,在 <? php 下增加一行
$_SERVER['HTTPS'] = 'on';
WordPress首页调用typecho方法!
前段时间花了那么多的时间折腾了《WordPress首页调用memos方法!》后,怎么又来折腾Wordpress首页调用typecho呢!原因有这样的两点,首先memos的作者对memos的更新真的是太随意了,每次版本的升级,你会想不到他会把什么功能给删掉、或是更想不到把数据库的结构给改了、还有就是随意改变API的接口。也正因为他的随意,一部分人还保持在低版本来使用,另外一部分人就是直接弃用了,所以我想着说不定哪一天也会弃用memos。另外的一个原因就是除了老张博客之外,我还有一个老张随笔,一直保持每日一更新,字数都是在二百字,就像朋友圈一样,最初是用typecho程序,后来改用memos,目前那个typecho上面还放着一千两百多篇随笔。我想与其这样牵强的用着memos,不如退回来用typecho算了。
有了上面的想法后,就想着把我的wordpress和typecho来个“整合”,在wordpress调用typecho的首篇文章。有了上一次的折腾,这次算是轻车熟路了,前前后后的折腾有两个小时。通过这次的折腾,让我对AI又有了新的认识,上次我认为是“豆包最聪明”,结果经过这次的“折腾”发现把相同的问题多次的提问同一个AI,每次他给出的答案也是不一样的。单单就响应速度来说,官方的GPT最为快,所以这次代码就是借助官方GPT来完成的。话不多说,直接上代码吧!
忘了一个重要的事: typecho本身没有提供API接口服务,这里我找到一款插件,Restful,安装后直接启用就行,因为我是直接调用文章的,其他的API接口就被我给关了!
1.把下面的代码插入到主题文件的index.php合适位置。
<?php
$data = fetch_typecho_data();
if ($data):
?>
<div class="latest-update" style="background-color: #f8f8f8;">
<div class="latest-update-header">
<h2>最新动态</h2>
<span class="latest-update-time"><?php echo esc_html($data['time_content']); ?></span>
</div>
<div class="latest-update-divider"></div>
<div class="latest-update-content"><?php echo esc_html($data['content']); ?></div>
<div class="latest-update-images">
<?php foreach ($data['image_content'] as $img_url): ?>
<a href="<?php echo esc_url($img_url); ?>" data-lightbox="latest-update-gallery">
<img src="<?php echo esc_url($img_url); ?>" alt="Image">
</a>
<?php endforeach; ?>
</div>
<div class="latest-update-footer">
<span class="latest-update-tag"><?php echo esc_html($data['tag_content']); ?></span>
<a class="latest-update-link" href="<?php echo esc_url($data['link_content']); ?>" target="_blank">查看全文</a>
</div>
</div>
<?php endif; ?>
<script src="https://cdnjs.cloudflare.com/ajax/libs/lightbox2/2.11.4/js/lightbox-plus-jquery.min.js"></script>
<link rel="stylesheet" href="https://cdnjs.cloudflare.com/ajax/libs/lightbox2/2.11.4/css/lightbox.min.css">
2.把CSS样式代码放置到主题CSS定义设置里,当然也可以直接放到style.css中。
/* 首页调用typecho样式 */
.latest-update {
    width: calc(100% - 40px); /* 设置宽度为100%减去40px,确保有左右边距 */
    background-color: #f8f8f8 ; /* 强制设置背景颜色为浅灰色 */
    border: 1px solid #ddd; /* 添加1像素的灰色边框 */
    border-radius: 10px; /* 圆角边框,半径为10px */
    padding: 20px 20px 10px 20px; /* 内边距,上下10px,左右20px */
    margin: 20px 0; /* 外边距,上下20px,左右0 */
    text-align: left; /* 文本左对齐 */
    margin-top: -10px; /* 减少与顶部的距离为0 */
    margin-bottom: 30px; /* 增加与文章列表的距离为40px */
    margin-right: 20px; /* 设置右边距为20px */
}

.latest-update-header {
    display: flex; /* 使用弹性盒模型布局 */
    justify-content: space-between; /* 头部元素左右分散排列 */
    align-items: center; /* 垂直居中对齐 */
    margin-bottom: 10px; /* 头部与下方内容的外边距为10px */
}

.latest-update h2 {
    font-size: 15px; /* 标题字体大小为15px */
    margin: 0; /* 去除默认外边距 */
    padding-left: 0px; /* 左边填充为0 */
}

.latest-update-time {
    font-size: 14px; /* 时间字体大小为14px */
    color: #666; /* 时间文本颜色为中灰色 */
    margin-right: 0px; /* 右边距为0 */
}

.latest-update-divider {
    border-bottom: 1px solid #333; /* 添加底部边框,颜色为深灰色 */
    margin: 10px 0; /* 上下外边距为10px */
}

.latest-update-content {
    text-align: left; /* 内容文本左对齐 */
    line-height: 1.5; /* 行高设置为1.5倍 */
    margin: 10px 0; /* 上下外边距为10px */
}

.latest-update-images {
    text-align: left; /* 图片区域文本左对齐 */
    margin: 10px 0; /* 上下外边距为10px */
}

.latest-update-images img {
    width: 100px; /* 图片宽度为80px */
    height: 75px; /* 图片高度为80px */
    object-fit: cover; /* 图片覆盖方式,保持比例并裁剪 */
    border-radius: 8px; /* 图片圆角,半径为8px */
    box-shadow: 0 4px 10px rgba(0, 0, 0, 1); /* 添加阴影效果 */
    margin: 3px; /* 图片外边距为5px */
    transition: transform 0.3s, opacity 0.3s; /* 添加平滑过渡效果 */
}

.latest-update-images img:hover {
    transform: scale(1.1); /* 鼠标悬停时放大10% */
    opacity: 0.9; /* 鼠标悬停时透明度降低到0.9 */
}

.latest-update-footer {
    display: flex; /* 使用弹性盒模型布局 */
    justify-content: space-between; /* 底部元素左右分散排列 */
    align-items: center; /* 垂直居中对齐 */
    margin-top: 10px; /* 底部与上方内容的外边距为10px */
    padding-top: 10px; /* 上内边距为10px */
    border-top: 1px solid #ddd; /* 添加顶部边框,颜色为浅灰色 */
}

.latest-update-tag {
    background-color: #e0e0e0; /* 标签背景颜色为淡灰色 */
    border-radius: 5px; /* 标签圆角,半径为5px */
    padding: 5px 10px; /* 内边距,上下5px,左右10px */
    font-size: 14px; /* 标签字体大小为14px */
}

.latest-update-link {
    text-decoration: none; /* 去除链接的下划线 */
    color: #0073aa; /* 设置链接颜色为蓝色 */
    font-size: 14px; /* 链接字体大小为14px */
}
/* 首面调用typecho结束 */
3.把下面代码插入到主题functions.php文件中。
//-------首页调用typehco代码-----开始
function fetch_typecho_data() {
$api_url = "https://suibi.zhangbo.net/api/posts?pageSize=1";
$response = wp_remote_get($api_url);
if (is_wp_error($response)) {
return;
}
$body = wp_remote_retrieve_body($response);
$data = json_decode($body, true);
if ($data['status'] !== 'success' || empty($data['data']['dataSet'])) {
return;
}
$post = $data['data']['dataSet'][0];
// 1. 链接内容
$link_content = "https://suibi.zhangbo.net/archives/" . $post['cid'] . ".html";
// 2. 标签内容
$tag_content = "#" . $post['categories'][0]['name'];
// 3. 时间内容
$created_time = (int)$post['created'];
$current_time = time();
$time_diff = $current_time - $created_time;
if ($time_diff < 3600) {
$time_content = floor($time_diff / 60) . "分钟前";
} elseif ($time_diff < 86400) {
$time_content = floor($time_diff / 3600) . "小时前";
} elseif ($time_diff < 2592000) {
$time_content = floor($time_diff / 86400) . "天前";
} else {
$time_content = date("Y年m月d日", $created_time);
}
// 4. 摘要内容
$digest = strip_tags($post['digest'], "![]() ");
$content = mb_strlen($digest, 'UTF-8') <= 200 ? $digest : mb_substr($digest, 0, 200, 'UTF-8') . "......";
// 5. 图片内容
preg_match_all('/<img.*?src=["\'](.*?)["\'].*?>/i', $post['digest'], $matches);
$image_content = $matches[1];
return [
'link_content' => $link_content,
'tag_content' => $tag_content,
'time_content' => $time_content,
'content' => $content,
'image_content' => $image_content
];
}
");
$content = mb_strlen($digest, 'UTF-8') <= 200 ? $digest : mb_substr($digest, 0, 200, 'UTF-8') . "......";
// 5. 图片内容
preg_match_all('/<img.*?src=["\'](.*?)["\'].*?>/i', $post['digest'], $matches);
$image_content = $matches[1];
return [
'link_content' => $link_content,
'tag_content' => $tag_content,
'time_content' => $time_content,
'content' => $content,
'image_content' => $image_content
];
}
WordPress首页调用memos方法!
老张一直想把wordpress和memos能整合在一起,前几天在段先生的博客上看到了教程,便死皮赖脸的问他方法,原来是AI搞定的。刚开始的时候是直接拿段先生的用,但是里面有一些达不到自己想要的效果。比如段先生是从memos的RSS文件里取数但,如果memo里有多篇图片的话,RSS只能输出一张链接地址,其他找不到。通过找木木大佬,用了他提供的《Memos API 非官方不完全说明》便可以解决。另外在CSS布局上也不是自己想要的效果,便想着自己也来让AI搞吧!
让AI帮你写代码,你必须要学会怎么样能更好的和AI对话,必须要有一点点的代码基础,才能把把问题问在点子上。我在把memos的API输出的数据模式先告诉AI,然后再提出自己的要求,要求如下:
我想在wordpress获取memos的api发布第一条动态内容,API的链接地址是https://zhangbo.net/api/v1/memo?creatorId=1&rowStatus=NORMAL&limit=1 ,内容格式如下:
按以下要求进行操作:
1.读取第一个"id"后面的数据,并形成“https://zhangbo.net/m/+“id后面的数据”” 做为链接,赋值给变量$link_content
2.读取"content"后面的数据,读取以#号开始、空格结束的内容,并在前面加#号后赋值给变量$tag_content。
3.读取"createdTs"后面的数值,转化为时间后与当前时间计算时间间隔。时间间隔为1小时内的,以时间间隔+“分钟前”赋值给$time_content;时间间隔为24小时内的,以时间间隔+“小时前”赋值给$time_content;时间间隔为30天内的,以时间间隔+“天之前”赋值给$time_content;时间间隔超过30天的,直接以“年月日”形式赋值给$time_content。
4.读取"content"后面的数据,排除“![]()”图片形式、排除#、#及空格前的内容后,赋值给$content。
5.读取"content"后面的数据,如果有“![]()”图片形式,将()内的图片链接赋值给$image_content;如果"externalLink": 后面有数据,赋值给$image_content;如果"filename"后面有数据,将以“https://zhangbo.net/o/r/+filename上第四行ID后的数值+"filename"的数据”赋值给$image_content。如果以上情况都存在,那将以数值组形式赋值。
以上生成的代码,将保存在wordpress的主题文件functions.php中以便调用。
按以下要求生成CSS代码
1.对于在首页展示的要求,在首页文章列表上方,与首页文章空两行
2.显示框宽度100%、背景灰色、四角椭圆。
3.第一个DIV展示框以"h2”格式展示“最新动态”四个字、靠左对齐、左边距空20px;务必同一行展示$time_content值,右居中对齐,右边距空20PX
4.第二DIV插入细实线、深灰色
5.第三DIV展示$content值
5.第四DIV展示$image_content值的缩略图,缩略图四角椭圆并有阴影,如果多图从左往右排列。并按确保引入 Lightbox.js,也写入到本代码中,达到点击放大效果
6.第五DIV靠左对齐展示$tag_content值,背景灰色并四角椭圆,靠右展示“点击评价”点击链接到$link_content。
再生成输出代码以便插入在首页文件index.php,以便在首页显示。/
我分别测试了官方GPT、三方GPT和豆包,结果是官方GPT直接来句“问题太复杂,请分类进行提问”,三方GPT给出的代码效果完全不对,而豆包给出的代码基本上达到要求。当然,还是由于自己的表述,导致代码在图片显示这块有些问题。今天中午利用几分钟时间,进行了修改,对获取图片链接地址重新让AI写,我是这样提问的:
我现在的要求是其他代码不需修改,只对获取图片链接重新按以下要求来修改
1.读取"content"后面的数据,如果有“![]()”图片形式,将()内的图片链接赋值给$image_content;
2.获取  "resourceList": []的中括号里数据,这是图片组,每组以{}进行区分,查询每个{}内的"externalLink",如果"externalLink": 后面有数据,赋值给$image_content;如果"externalLink"无数据,则以“https://zhangbo.net/o/r/+该图片id+"filename"的数据”赋值给$image_content。
如果以上情况都存在,那将以数值组形式赋值。
经过这样的修改,图片才得要正确显示。后来又陆陆续续的修改了CSS样式,最终达到目前的效果。
现在把相关代码贴给大家吧,需要的自取,不合自己要求的,也可以让AI帮你来修改。
1.把下面的代码插入到主题文件的index.php合适位置。
 <?php
$memoOutput = processMemoData();
if ($memoOutput) {
echo $memoOutput;
}
?>
<script src="https://cdnjs.cloudflare.com/ajax/libs/lightbox2/2.11.4/js/lightbox-plus-jquery.min.js"></script>
<link rel="stylesheet" href="https://cdnjs.cloudflare.com/ajax/libs/lightbox2/2.11.4/css/lightbox.min.css">/* Your code... */
2.把CSS样式代码放置到主题CSS定义设置里,当然也可以直接放到style.css中。
/* 首页调用memos效果---开始 */
/* 缩小与顶部距离,增加与首页文章列表距离 */
.memo-display {
    margin-top: 0px; /* 减少与顶部的距离 */
    margin-bottom: 40px; /* 增加与文章列表的距离 */
    margin-right: 40px; /* 设置右边距为20px */
    width: calc(100% - 40px); /* 计算宽度以适应右边距 */
    background-color: #f2f2f2;
    border-radius: 10px;
    padding: 20px;
    border: 1px solid #ccc; /* 添加细线边框,颜色为浅灰色 */
}


/* 第一个 DIV:展示“最新动态”和时间 */
.memo-header {
    display: flex;
    justify-content: space-between;
    align-items: center;
}
.memo-header h2 {
    margin-left: 0px;
}

.memo-header span {
    margin-right: 0px;
}

/* 第二 DIV:插入细实线、深灰色 */
.memo-divider {
    border-top: 1px solid #999;
    margin: 10px 0;
}

/* 第三 DIV:展示内容 */
.memo-content {
    margin-bottom: 10px;
    line-height: 1.5; /* 或者可以使用具体的像素值,如 1.5em 或 24px */
}
/* 第四 DIV:展示缩略图 */
.memo-images {
    display: flex;
    flex-wrap: wrap;
}

.memo-images img {
    border-radius: 10px;
    box-shadow: 0 0 10px rgba(0, 0, 0, 0.3);
    margin-right: 10px;
    cursor: pointer;
    transition: transform 0.3s ease; /* 添加过渡效果 */
}

.memo-images img:hover {
    transform: scale(1.1); /* 鼠标悬浮时放大 */
}

/* 第五 DIV:展示标签和链接 */
.memo-footer {
    display: flex;
    align-items: center;
    margin-top: 10px; /* 设置与上面容器的距离为 30px */
}

.memo-footer div:first-child {
    background-color: #9999;
    border-radius: 6px;
    padding: 5px 10px;
    margin-right: 10px;
}

.memo-footer a {
    text-decoration: none;
    margin-left: auto; /* 靠右对齐 */
    margin-right: 0px; /* 右边距 20px */
}
/* 首页调用memos效果---结束 */
3.把下面代码插入到主题functions.php文件中。
/* Your code... */
//-------首页调用memoe代码-----开始
function getTimeContent($createdTs) {
$current_time = time();
$time_diff = $current_time - $createdTs;
static $cachedTimeContent = null;
static $lastCreatedTs = null;
if ($lastCreatedTs === $createdTs) {
return $cachedTimeContent;
}
if ($time_diff 100) {
$substr_content = mb_substr($content, 0, 100, 'UTF-8');
$last_char = mb_substr($substr_content, -1, 1, 'UTF-8');
$last_char_ascii = ord($last_char);
while ($last_char_ascii 126) {
$substr_content = mb_substr($substr_content, 0, -1, 'UTF-8');
$last_char = mb_substr($substr_content, -1, 1, 'UTF-8');
$last_char_ascii = ord($last_char);
}
$content = $substr_content. '......';
$link_text = '查看原文';
} else {
$link_text = '点击评价';
}
$content_without_tags_and_images = preg_replace('/#.*? /', '', $content);
$content_without_tags_and_images = preg_replace('/!\[.*?\]\(.*?\)/', '', $content_without_tags_and_images);
$content = $content_without_tags_and_images;
// 构建输出内容
$output = '';
$header = '最新动态
'. $time_content. '';
$divider = '';
$contentDiv = ''. $content. '';
$imagesDiv = '';
if (!empty($image_content)) {
$imagesDiv = '';
}
$footer = ''. $tag_content. ''. $link_text. '';
$output.= $header. $divider. $contentDiv. $imagesDiv. $footer;
$output.= '';
return $output;
}
OK,结束!折腾十几个小时,就是出了这篇教程!!
完美实现手机照片自动上传至NAS并同步到网盘!
昨天一天时间,博客群里都是在谈论NAS,这又把我折腾的心勾的痒痒。对于NAS,我一直的观点就是自己DIY不买成品,买成品的价格至少要贵上1倍。在2019年的时候就折腾过NAS,那个时候买的都是矿渣,先是买了蜗牛星际,后来《上车了!暴风播酷云二期“开包”记!》。为了折腾NAS,单独买了两块4T的红盘,但是,但是后来其中一块硬盘还没有到一年时间就挂掉了。虽然免费换了新,但是里面的数据没有了,还好里面存的都是一些电影而不是重要数据。至此,NAS会坏硬盘这个阴影一直存在脑子里。没多久,就把暴风二期给卖了。
昨天我说出我对NAS存在坏硬盘的阴影时,老刘说我这是因噎废食。想想也是,NAS上硬盘坏了的直接原因是硬盘本身的质量问题,而不能去怪Nas。那就把吃灰的NAS重新折腾起来吧。目前我的硬件环境是用的J4125小主机外拖一个硬盘盒,里面是拆机的硬盘1T和4T各一块,搞的all in one。选用ESXI做的底层,ikuai爱快做主路由拨号,openwrt做旁路由负责科学等,另外通过一键脚本安装了黑群晖DSM。J4125主机资源还没有用完,准备再搞个Debian来折腾。那个黑群晖自安装后就一直吃灰,后来干脆把电源都给关了,昨天晚上回到家,才连上ESXI给NAS开了机。
如何将手机里的照片自动上传到NAS,并自动同步到网盘呢?这里我们需要用到这样的两个套件Synology Photos和Cloud Sync,两个都是官方套件,直接安装即可。
Synology Photos 是 Synology NAS(网络附加存储)设备上的一款强大的照片管理和共享应用程序。它集成了照片存储、管理、备份和分享等功能,旨在为用户提供一个安全、高效的照片管理解决方案。以下是一些 Synology Photos 的主要功能和特点:智能分类和搜索、多设备同步、分享功能、高效的备份解决方案、照片编辑。相册管理等。
Cloud Sync 是 Synology NAS 提供的一个功能,允许用户将本地 NAS 数据与云存储服务(如 Google Drive、Dropbox、OneDrive 等)进行同步。这个功能非常适合需要备份数据、实现数据冗余或在不同设备间访问文件的用户。以下是 Cloud Sync 的主要功能、使用场景以及设置步骤。主要功能:双向同步、单向同步、增量同步、自定义同步规则、版本控制、调度同步、文件过滤等。
手机上需要安装Photos这款APP,直接从群晖的官方网站下载。Photos这款APP是和群晖上Synology Photos是配套使用的,都是属于照片管理器。
具体使用方法不再多去赘述了,傻瓜式的安装、使用。简单原理就是通过手机Photos这款APP和群晖Synology Photos套件配合把手机照片自动上传至NAS,再通过Cloud Sync 自动同步到各大网盘等。今天早上测试了下,手机刚刚拍的照片,到百度网盘上就可以看到了,真的是实现了秒传。
这样,所拍摄的照片,手机→NAS→网盘,全自动化,再也不用担心硬盘坏掉了!
近期想搞个高配一点的小主机做个all in one,基本要求32G内存、2块4T硬盘、CPU嘛12300T或以上、多网口网卡等,要小,可以放在鞋柜里。大家有什么可以推荐的嘛!价位在3000以下!
写在老张博客十五周年
真的没有刻意去记今天,只是今天偶尔看网站信息时,才注意到建站时间是2009年10月9日,算到今天,正好是十五周年。到我提笔止,老张博客十五年里,不包括本篇共发布了787篇文章。评论数为18412条,其中应该有一大半是我回复评论。浏览总次数为5230094次,乍看这523万浏览量蛮大的,其实这是长时间积累的,平均每天也不过千。
老张根据文章归档,来回忆下老张博客走过的十五年的路。其实老张建博客是在2008年,只不过那个时候对“数据安全”没有概念,搞个博客正常丢数据。目前的数据是从2009年10月9日一直使用到现在的,现在是每天做备份,生怕哪数把数据搞丢了。
2009.10-2010.7:摸索爬行期:
想不起来老张当初因为什么建博客了,根据2009年归档的所谓的文章来看,从2009年10月建站到2010年7月中旬,基本上是转载别人的文章或是自己简单发两句话。可能是前一年对写博客并没有什么经验,只是去折腾但并没有把折腾的过程记录下来。建站前一年,可以说是摸索爬行阶段。
2010.7-2011.4:辉煌成就期
从2010年7月28日《WordPress更换域名后所要注意的十件事》这篇文章开始,到2011年4月份,原创了大量Wordpress方面的教程,同时总结了SEO方面的技术经验文章。这一年时间里,是原创高质量文章最多的一年,很多篇教程当时被admin5等站长网站收录,当然也引来了很大的流量,可以说这一年是老张博客最为辉煌的一年。
2011.5-2018.9:歇菜苟活期
2011年5月份开始,歇菜了,这段时间应该去折腾易语言去了,因为出现了一些易语言方面的教程。也就是从那个时候开始,老张博客在“苟活期”,你说不更新吧,偶尔那么转载两篇文章,你说更新吧,一年也就是更新十来篇。老张博客的苟活期或是说“空白期”相当的长,从2011年5月一直持续到2018年9月,长达七年之久。
2018.10-今:平稳发展期
2018年10月份起,老张博客从技术型博客转到“技术生活类”博客后,才算是基本上稳定。也就是那这个时候开始,内容为记录一些自己折腾的过程,分享一些自己的生活。更新基本上算是有规律,达到每个月四五篇,一直保持到现在。也就是说,真正意义上的写博客只能算是2010年7月至2011年5月,以及2018年10月起到现在,满打满算,也就是6年时间。博客十五周年,而真正写博客也就是六年时间,也算是可悲哟。
博客大事件
结合着前段时间软云的跑路风波涉及的数据安全来讲,来说说老张博客这十五年来遇到了两件“大事件”。
第一件事就是2017年长时间不上博客,未能及时更新博客程序和各种插件,导致各项版本太旧,有黑客利用漏洞入侵了我的空间,所有网站文件全被挂马。这个技术方面的事自己是搞不来的,还是在“游子”的帮助下花了大量的时间才得以解决。
另外一件大事就是“游子失联”。游子,一个非常不错的空间商,他真的能和客户打成一片,包括我在内,他的长期客户非常多,我用他的空间有十余年时间。但是在2020年11月份,游子的所有服务器全部停机,而游子又联系不上。我在《历经一劫,博客重生!》详细介绍了整个事件的过程。好在后来在朋友的帮忙下,直接打款给IDC商后开通了一个季度的机器才把数据得以保存。对于游子的失联,我们所有群里客户并不是担心“赔偿问题”,而是考虑到游子的个人安危问题。有位客户离游子比较近,单独开车百余公里去找游子,功夫不负有心人,找到了游子的老婆。这时才知道,原来游子在给一家P2P公司做网络方面的技术顾问,最终这家公司资金断链而被起诉,被定性为诈骗,游子也被牵涉其中而被留置。到现在已经五年时间了,游子客户微信群一直还在,但是还没有游子的身影,不知道他过的怎么样了。
老张博客十五周年了,不管你的博客在大厂还是小厂,定期做数据备份,把数据牢牢的抓在自己手里,还会有下一个十五年!再下个十五年,无数个十五年。
